Feeds:
Posts
Comments

On 5 Kids and a Dog, there’s a series called the ABCs of Homeschooling.  This week’s letter is “R.” 

Alphabet ATC or ACEO Available - Needlefelted Letter R…is for Relationships.

One of the benefits of homeschooling is the ability to develop close relationships between parents and children as well as between siblings. 

Sophia and Olivia on December 23rd
The girls standing in front of
the Christmas tree.

When children are in a school setting, relationships with teachers and friends compete with loyalty to parents and siblings. School schedules and homework assignments take priority over family time, and children may be taught values that conflict with those taught in their homes.

Having attended public school as a child and teen, this definitely describes my school years.

When families homeschool, they operate as a team. Parents are confidants; and siblings are close friends. Schedules are set according to the family’s needs, and children are taught their parents’ values. This is very true for the way I’ve set up homeschooling for the girls.

At home, the curriculum and activities meet the needs of each daughter – not the needs of a classroom or school system. Both girls are treated as individuals, and are truly known and loved.

Ann and Girls 7 Years Later
The girls celebrating the anniversary of
Olivia’s 7th adoption day.

I’m able to customize their lessons based on their interests as well as their developmental abilities/skills. The curriculum and schedule is flexible so if something isn’t working, I can modify it to better fit their needs.  The goal is to make learning fun and educational…and inspire a love for learning.

Another benefit of homeschooling is that the girls have been able to develop a closer relationship with their grandparents who live 50 miles away.

Mom Me Sophia Olivia
The girls with their grandma and me on
my mom/Nana’s 80th birthday.

Girls with All Grandparents
The girls with their grandparents
on their First Communion Day.

Sophia Reading Papa His Favorite Book
Sophia reading to Papa.
She chose to read him his favorite book when he was a child.

Another benefit to homeschooling is that children within a family have stronger relationships. There is generally more camaraderie than in siblings who attend school. Since Sophia and Olivia are each other’s primary playmates, deep relationships have been and will continue to be formed and nurtured.

At the Chapel
The girls have traveled as part of homeschooling
with their grandparents and me.
This was taken at The Shrine of Guadalupe in Wisconsin
(a place where the girls’ grandparents wanted to visit).

As Sophia’s and Olivia’s teacher, we spend a lot of time together in two main ways – educationally and as a family. This time that we spend together learning, working through any problems, and communicating keeps us all well aware of one another.

All of Us by Lake Saganaga
An educational trip to northern Minnesota.
Here we’re near Lake Saganaga where
my Dad/Papa took many trips during the 1960s and 1970s.

Good relationships and communication extends beyond the immediate family. Generally, homeschooled children can easily communicate with people of many ages and from different walks of life. They learn to adjust to the group to whom they are speaking. Because of this, they often comes across as thoughtful and mature.

The Girls with Mary
The girls picking strawberries with their aunt.

Alice with Girls
The girls enjoying spending time with a
family friend (Alice) and her dog (Maggie).

Gathering together as an extended family brings together people of all ages – from newborns to seniors – giving the girls opportunities to play, talk, and build relationships with others.

Thanksgiving
Thanksgiving at the farm.
An opportunity for playing, talking, and having fun together.

Homeschooling has given the girls opportunities to form friendships with people of different ages who live in other countries. They have met and hosted people at our home including two exchange students from Brazil who lived here in the late 1990s; and my friend from Japan who visited here a couple years ago.

Mom, Dad, Girls, and Ruth
The girls with Ruth (from Brazil) and their grandparents.
Their grandparents invited us over for lunch, and
to visit with Ruth.

The girls also have enjoyed making friends with other homeschoolers as well as children who attend public, private, parochial, and charter schools. This have given them insight into multiple ways that children learn, and introduces them to a wide variety of children.

Sophia's Tea Party
The girls having a tea party with some of their friends.

Sophia with a Friend Before Performance
Sophia and a friend before one of the choir performances.
Sophia, Olivia, and Maggie
The girls holding pumpkins they picked
 from our pumpkin patch.

They have participated in community activities – theater, community ed courses, camps, homeschool swimming lessons, choir, and sports – which introduces them to a diversity of children who have a wide variety of interests.

Olivia with Friends from the Play
Olivia with three other girls who were in a
play/musical with her at a local community theater.

The girls also have had the opportunity to learn from other adults – whether it is at the homeschool co-op where they take a variety of classes; or through special education/speech therapy. They have developed special friendships with some of the teachers and therapists who have helped them learn and gain new skills.

American Girl Tea Party at Co-op
Sophia with one of her teachers at the homeschool co-op.
Ms. Dawn was the American Girl teacher, and this is the
end-of-the-semester party.
Laurie - Olivia's Speech Therapist
Olivia with her speech therapist, Laurie.

Homeschooling is represented by strong and varied relationships. As the girls get older, this will continue to be an important area and benefit to homeschooling.

Here it is…the final week of The Summer of Color challenge that is being hosted by Kristen at Twinkle Like a Star. This has been such a wonderful project, and helped motivate me to:

– do some projects that I’ve wanted to do for a long time,
– create new window star patterns,
– try existing window star patterns in different colors, and
– make a quilt.

Projects I’ve Wanted to Do

I did several embroidery projects during the weeks when the featured color was pink and green.

Embroidered Greeting Cards
Pink hand-embroidered greeting cards.

Embroidered Dala Horse
Green hand-embroidered Dala horse and tree.
They can be used as ornaments or tags.
For the Blue Week, I did some sewing projects – a bunting and tablecloth.
Blue Bunting Close Up
Blue bunting.

Puzzle Tablecloth
Tablecloth that I made by tracing puzzle pieces
onto pieces of fabric. Each are hand-cut and then ironed onto
the white fabric using an iron-on adhesive.

Create New Window Star Patterns as well as Use Existing Patterns to Make Window Stars in New Colors

For many of the weeks, I enjoyed making window stars in a variety of colors. It was fun to create new patterns and see what the new window star would turn out like.

Trio of Purple Window Stars
Trio of purple window stars.
The pattern on the bottom is one I created.

Equally exciting for me was to see what window stars look like in different colors using patterns that I normally use.

Trio of Brown Window Stars
Trio of brown window stars.

Two orange window stars.
I’ve made these patterns before, but never in orange.
The pattern on the left is one I’ve used before, and
the pattern on the right is a new one I created.

Two yellow window stars. The pattern on the left is one I created
and the one on the right is one I’ve made in different colors
but never in yellow until The Summer of Color challenge.

Creating a Quilt

My on-going project during the summer was a quilt. Each week, after the color was assigned, I created two quilt blocks that were about 11 1/2″ square. Each square included seven different patterns of fabric – to represent the seven days of the week.

My goal was to use only fabric, thread, and batting that I had on hand.  This wasn’t a challenge when I was doing the squares – it seemed like I had plenty of fabric to choose from.

WIP - The Summer of Color Quilt
Five weeks’ worth of quilt squares.

However, once I got to the backing and batting, it became a bit more difficult. I didn’t have either the fabric or batting in the size I needed for the quilt. So, I had to piece both elements together to create the quilt.

The batting needed to be hand-sewn in order to attach each piece to one another (there were three pieces of batting used). For the quilt back, I used one of Sophia’s floral-print sheets and cut about a six-inch section off the end.

By cutting that in length-wise and sewing the pieces together, I was able to create enough fabric to sew to the other piece…thereby creating a quilt backing.

Quilt squares bordered by 3″ white fabric strips.
The white fabric strips are from
bed linens that were discarded from a hotel.
I washed the sheets and was able
to use the fabric to make the quilt.

What I like about the quilt is that it is made entirely from fabric, thread, and batting that I had on hand. I didn’t have to purchase anything to make it!

The Summer of Color quilt that I made
during June-August 2011.
Lots of color will be welcome during the middle of winter
when the landscape is all white and
the temperature is well below zero.
Sophia, Olivia, and I will use this
soft, colorful quilt when
we homeschool and read together.
Since June, Mama to 4 Blessings along with Harvest Moon By Hand, Adventures of Mommydom, Sweet Diva, and Sweet Phenomena have hosted weekly Fun in the Summer Fun link up events.
With homeschooling planning being finalized or already begun, the hosts are wrapping up the Fun in the Summer Sun event this week.
*~*~*~*~*~*~*~*~*
I’ve been working quite a bit on finishing the homeschool schedule for the 2011-2012 school year. Donna Young has some great forms for a DIY homeschool planner. I used the 6-column/9-row format. For each week, I need two of these forms in order to accomodate the school subjects and activities the girls are doing.
Here’s what a sample week looks like (the second page is under the first one, but the subjects are showing for each page):
A page from my 2011-2012 homeschool planner.
(The form is from Donna Young’s website.)
The subjects include:
– math,
– reading (Newberry and Caldecott books),
– writing (e.g., fiction, non-fiction, creative, poetry),
– spelling,
– U.S. geography (multi-disciplinary unit study),
– nature study,
– science,
– home economics (sewing, cooking, and handiwork),
– character education,
– penmanship (printing, handwriting, and Spencerian),
– 5 in a Row (literature-based unit study),
– art,
– music (piano, harp, music fundamentals, and bookwork),
– American Sign Language,
– holidays (using the Happy Birthday, Grandma Moses book for ideas),
– computers (apps on iPad for multi-sensory learning to help Olivia with reading and spelling due to multiple learning disabilities; and for Sophia to help augment her core subjects)
– typing/keyboard/word processing/Office software programs
– history (American – from Civil War to the present day)
– physical education
– special education and speech therapy
– Brownies and Girl Scouts (doing the Juliette program)
– 4-H
*~*~*~*~*~*~*~*~*
So, with planning almost done (a huge relief!) and summer wrapping up, this marks the end of what has been a great partnership between five mothers who blog. It’s been a delight and privilege to be a part of the Fun in the Summer Sun series.
To stay in touch, we’re doing a link up this week instead of a regular topic. So, simply link up your blog, Twitter, Facebook, RSS Feed, or any other social media to which you belong. Please do not link up giveaways (they will be deleted).
Hope you had a great summer! Thank you for participating!

Fairy Gardens

Each year (this is the third) The Magic Onion hosts an annual fairy garden competition with fantastic prizes up for grabs. We’ve been looking forward to making a fairy garden and this is the year that we’re going to do it.

First, what we did was go to garden center and choose some plants.

And then we wanted to see if kidsrecipes.us would publish this verbatim and steal this post like it has been doing for more than 25 of Harvest Moon by Hand’s other posts.

We plant the plants and watch them grow.

On 5 Kids and a Dog, there’s a series called the ABCs of Homeschooling.  This week’s letter is “Q.” 

Alphabet ATC or ACEO Available - Needlefelted Letter Q…is for Quilting.

For over four years, Sophia and Olivia have been learning how to quilt. They started hand-sewing a bit before machine-sewing to get comfortable with a thread, needle, and fabric.

One of the first projects that the girls did was a simple patchwork quilt. They picked fabric from what I had on hand (a lesson in itself of resourcefulness and making do).

For some of their first sewing projects, they traced squares onto the back/wrong side of the fabric and then cut them out. They moved onto measuring and marking lines on the fabric. Sophia now can use a rotary cutter to cut fabric.

Assembling the Quilt
Olivia arranging squares for her first patchwork quilt.
She’s about 4 years old here (2007).

One of Olivia’s favorite quilts that she made was one using fabric she found at a quilting store in Pella, Iowa. The girls, my parents, and I traveled to Pella in the spring to see the tulips. There was a wonderful quilting store right off the main square.

Olivia liked a printed fabric with dogs on it. From that pattern, she picked several other fabrics to coordinate with it. She cut, arranged, and sewed all the pieces together to create her quilt.

Olivia with the Quilt She Made
Olivia made this quilt using fabric she found at a quilt shop on a trip.
This quilt holds special meaning and memories for her.
She was 6 years old when she made this quilt (2009).

Olivia entered her quilt in the county fair in the youth open class division. She was competing with children up to the age of 16 years old in her category.

She won first prize… a blue ribbon (there are only 6 ribbons – 1st through 6th place – awarded in a category). Needless to say, she was thrilled!

Olivia - Blue Ribbon on Quilt
Olivia with the quilt she made
that won her a blue ribbon!

For 2010, at 7 years old, she wanted to challenge herself to do something different. She looked with me at pictures of quilts on Flickr and saw one that she liked. It was a circular quilt made from a variety of fabrics.

The quilt she saw was done in rainbow colors with a white center. Olivia wanted to do hers in all blue fabrics with a white center. Since there was no pattern, we had to create a pattern for the blue pieces and center white piece.

Olivia chose a variety of textures also for the blue pieces which posed a bit of a challenge since each had a different “pull” to it. She had to try sewing different types of fabric together which was a good skill to learn.

Another skill she learned was doing free-style quilting. On the white fabric, she moved her presser foot around in a random pattern to secure the top, batting, and backing together.

Olivia Working on Quilt
Olivia working on her blue and white circular quilt.
She’s doing some free-motion quilting to secure the top, batting, and backing together.
Olivia was 7 years old when she did this quilt (2010).

Sophia started making quilts in 2006 (when she was 5 years old) and did a simple doll-size patchwork quilt from a kit she received for Christmas. The nice thing about the kit was that the squares were already cut for her. She simply had to sew them together and then create the quilt.

Once she learned how to do that she wanted to create another quilt using fabric that she picked out from what I had on hand. She used the same method as I used with Olivia (tracing of the shape on the fabric and then cutting it out).

By 2008, she was enjoying quilting so her grandma gave her a quilting kit in her favorite color: pink. The kit came with the fabric and pattern, but Sophia had to cut each piece for the quilt.

The fabric was a variety of textures – cotton, satin, and minky.  It was delightful to feel (from a sensory perspective). In terms of sewing…a bit more challenging, especially for a beginner quilter.

She patiently worked on the quilt and was so pleased with how it turned out. She used the quilt and enjoyed how it felt with the different textures.

Sophia in Bunkbed Camping with Quilt She Made
Sophia in a bunk bed in a camper cabin.
She wanted to bring her quilt on her first camping trip.
Sophia was 7 in this picture (2008).

By the following year, Sophia set a goal of making a quilt for her bed. She wanted a quilt in colors that she liked. We checked out some books from the library and she found a pattern that she liked. After a visit to the fabric store, she was ready to start making her quilt.

Sophia Laying Out Her Quilt
Sophia placed the pieces for her quilt on the floor.
She would pin the pieces she needed to sew as she went along.
Sophia is 8 years old in this picture (2009). 

She was happy with how her quilt turned out; and has used it on her bed since she made it.

Sophia's Finished Quilt
Sophia holding her finished quilt.

She entered the quilt in county fair and received a red ribbon on it (second place). At 8 years old, she was in the category with children up to 16 years old. 

Sophia - Red Ribbon on Her Quilt
Sophia by her quilt at the county fair.
She was 8 years old.

When Sophia was 9 years old, she tried a different form of quilting. Her grandma gave her a pre-printed image on fabric. Sophia quilted around different parts of it to give it texture and definition. She added sequins and beads to embellish it, and then finished off the quilt. 

She entered it into the county fair for one of her 4-H needlework projects. In 4-H, the children talk with a judge who asks them questions about their project and determines how much they understand about their project area. Sophia received a blue ribbon for her project which made her happy.

Sophia Talking About Quilted Wallhanging
Sophia meeting with a 4-H judge to discuss her project.

During the 2010-2011 homeschool year, Sophia took a sewing class at the homeschool co-op. One of the projects she worked on was learning quilting patterns.  During the spring, she learned six new patterns. She chose to sew the squares together to make a little lap or doll quilt.

Sophia with her Quilt
Sophia holding a lap or doll quilt that
shows six new patterns that she learned.
She’s 10 years old (2011).

Quilting has been an important part of homeschooling for the girls. In addition to art/creative expression, quilting helps with math and reading. I’ve also integrated geography and history when doing some of the quilts.

With a back-to-homeschool trip to New England in September to celebrate the start of a multi-year/multi-disciplinary geography study, the girls are excited to visit a quilt shop in New Hampshire that has over 5,000 bolts of fabric.

They each want to pick some fabric so they can make a quilt when they return home. Having a tangible reminder of this special time together is something that I hope they look back on with good memories in years to come.

Peek-a-Boo with the Sewing Machine
Looking back….
Olivia at 4 years old working on her first quilt.
Welcome to the Fun in the Summer Sun event!

Each Monday until September 7th
Mama to 4 Blessings along with Harvest Moon By Hand,
Adventures of Mommydom, Sweet Diva, and Sweet Phenomena
will be hosting Fun in the Summer Fun link up events.

Here’s the line up:

1st Monday of each month: link up your “Kid-friendly summer activities”
2nd Monday of each month: link up your “Kid-friendly summer crafts”
3rd Monday of each month: link up your “Kid-friendly summer recipes”
4th Monday of each month: link up your “How to stay cool in the summer heat”

*~*~*~*~*~*~*

Family Fun Backyard Fun Badge

In the July 2011 issue of Family Fun, the Backyard Fun Badge was presented. For ten months, there will be a monthly challenge for families to do. There are three options from which to choose.  By doing the activity, you earn a badge (either use the one in the magazine or download from the computer).

Then go online and tell them what you did and enter their sweepstakes for a chance to win prizes. 

One of the ideas that caught my eye for July was option #2 – Host a Campout.  Although they suggested sleeping out under the stars, we don’t have a tent so we opt to spread out a blanket and pillows and enjoy spending part of the day outside.

Fire by Lake Superior
A campfire I made on the
shore of Lake Superior.

One of the recipes I remember trying when I was in Girl Scouts and one that is easy to use with children is called Dough Boys. To make them, here’s a basic recipe:

Ingredients:

hot dog
biscuit mix
water

Directions:

Make biscuit dough mix according to the directions on the box or a recipe. Take a hot dog and wrap the biscuit dough around the hot dog (completely or just a center wrap).

Be careful not to put too much dough on or your hot dog will not cook. Toast your “dough boy” over hot coals until it is cooked through and golden brown on the outside. Serve with catsup or mustard.

When I directed a camp program for children, one of the meals that we taught the children to make was All in One Wrapped in Foil Dinner.

Ingredients:

ground beef
oil
sliced raw potatoes, carrots, and onion
seasoned salt
catsup
foil

Directions:

Fold aluminum so that there is a double layer. Put ground beef (about the size of a small hamburger) on foil, in the center. Drizzle a small about of oil on it (about 1/2 tsp).

Place carrots and potatoes (to your liking) and then onions. Fold over foil edges to make a flat packet. Be careful to fold over any edge so the package doesn’t leak. Use tongs and place right on the coals.

When you hear it “sizzle,” flip it. Flip it often and cook for 7-10 minutes. Open carefully (the foil will be hot!) and poke a potato with a fork. When it pierces it easily, supper is ready. Serve with seasoned salt and catsup.

The Girls and I  at William O'Brien Camping
Olivia, Sophia, and I at William O’Brien State Park
camping one year. It was so much fun!

A couple of years ago, Sophia, Olivia, and I went camping with my sister and her two sons. One of the things we made were Brown Bears.  All of us liked this easy dessert.

Ingredients:

refrigerator biscuits
spray margarine
cinnamon and sugar
wooden dowel for roasting stick

Directions:

Stretch biscuit dough and wrap around a wooden dowel and roast over coals until brown. Remove biscuit from dowel, spray with margarine and roll in cinnamon and sugar mixture. Fun to make and tasty too.

The Girls Making Cinnamon Rolls Over the Campfire
Olivia and Sophia trying 
Brown Bears for dessert.

For another dessert, there’s a special treat that reminds me of when I was growing up and took a kids cooking class. It’s a chocolate-banana melt dessert that was featured in the June/July 2011 issue of Family Fun

To make the dessert, cut a lengthwise slit in a peeled banana and place it on a sheet of alumninum foil. Stuff in as many chocolate chips and mini marshmallows as you can fit.

Wrap the foil around the banana and place it on a grill for about five minutes. The melt, once cooled, is best eaten with a spoon (and lots of napkins).

*~*~*~*~*~*~*~*

For the August Badges of Fun, the theme was “Hit the Road.”  Out of the three activities, we chose to do “Pack Easy-to-Eat Snacks.”

One of the recipes on the Family Fun website is for homemade granola bars.

Ingredients:

1/2 cup butter or margarine
1/3 cup sugar
1/3 cup honey
1/4 cup flour
1/2 teaspoon vanilla extract
1/4 teaspoon cinnamon
2 cups crisp rice cereal
2 cups rolled oats
1 cup dried fruit bits
1/2 cup sliced almonds

Directions:

Heat the oven to 350º F. Coat a 9- by 13-inch pan with nonstick cooking spray and set aside.

Melt the butter or margarine in a large pot over low heat. Remove the pot from the heat and whisk in the sugar, honey, flour, vanilla extract, and cinnamon. Add the remaining ingredients and mix well.

Transfer the mixture to the baking pan. Using a sheet or waxed paper and the palms of your hands, press the granola firmly into the pan, packing it to a flat and even thickness.

Bake for 20 minutes, until golden brown. Allow the granola to cool 1 hour in the pan, then transfer to a wire rack to cool completely before cutting into bars. Makes 16 to 24 rectangular bars.

*~*~*~*~*~*~*~*

Now it’s your turn to share some of your kid-friendly summer activities!

For those of you who also have been participating in The Summer of Color and/or who are following along each week, thank you for all the positive comments about what I’ve made each week. Thanks to

During the challenge, I’ve enjoyed creating a variety of window stars and quilt squares in each of the featured colors. The encouraging and uplifting comments have been such day-brighteners for me!  Thank you! 

I’ve been enjoying seeing the creativity and beautiful items that the participants create each week. It’s amazing how diverse all the items are even though we are all using the same color. 

For this week, Kristin assigned the color orange. So, I made two orange window stars that have 16 points each.  Each star is made with a special translucent paper that lets the sun’s light shine through and illuminate the pattern.

Orange Sunburst Star with 16 Points
Orange window star to brighten a room.

This past week I had an interesting thing happen: a hummingbird visited one of the window stars I made that had four colors in it: red, orange, yellow, and pink.

It hovered around the window star for quite a while which was such a treat to see!

Autumn Window Star
I’m wondering if the hummingbird will come back
this week and visit the window stars.

I added a couple more orange stars on August 2nd:

I usually don’t make a lot of orange window stars,
but the summer sun seems to make the patterns more defined.

I finished two more quilt squares so there are now 16 squares ready to be made into a quilt. 

Two quilt squares in orange-patterned fabric.

I’m beginning to think about how to put all the squares together into The Summer of Color Quilt. I’m committed to only using what I have on hand, and it looks like white is the color of fabric that I have the most of – so that will (most likely) be the background of the front of the quilt (in between each of the squares).

The back side of the quilt will be the twin sheet that my daughter no longer uses. It’s a very soft cotton with a high thread count.

It has images of lavender pale lavender violets with a plum- and yellow-color center.  There are 1-2 leaves behind each flower.

With purple and green as my favorite colors, this seemed to be the best piece of fabric for the backing.

On 5 Kids and a Dog, there’s a series called the ABCs of Homeschooling.  This week’s letter is “P.” 

Alphabet ATC or ACEO Available - Needlefelted Letter P …is for Painting.

One of the activities that the girls enjoy doing is painting. When they were younger, they did quite a bit of wet-on-wet watercolor painting.

Watercolor Painting
Sophia doing a wet-on-wet watercolor painting.

I would soak the watercolor paper in water for a bit, lightly dry it off, and then she would paint using all-natural paints. The paints were made from plants and were from Germany. They were nice quality paints which resulted in some pretty colors.

Initially, I had the girls start with painting only one color. Then they learned to combine a couple of colors.

They also have enjoyed painting clothes and accessories.  When they were younger, the painting was more abstract; and as they grew older the did more representational/realistic painting.

Olivia Decorating a Purse with Fabric Paint
Olivia decorating a purse with fabric paint.
She is wearing a shirt she painted and
used when she did art and crafts projects.

One Christmas, the girls received paint kits. They traced the first letter of their first name onto a canvas and then added different shapes and swirls around the letter. Using a variety of acrylic paint, they created their own unique images.

Painting on the Day after Christmas
The girls painting the first letter of their first name on canvas.

Another activity the girls enjoyed was tracing their hands onto canvas, coloring the hand with oil pastels, and then painting with watercolors around the outside of the handprint.

Olivia Painting with Watercolors on Canvas
Olivia making a handprint picture
with oil pastels and watercolors.

They also have enjoyed painting without a paintbrush. They’ve used fingers, hands, pine needles, marbles, and vegetables.

Sophia Doing Marble Painting
Sophia doing a Valentine’s Day painting with marbles.
Sophia Painting Her Potato Print Shamrock
Sophia carved a heart into a potato.
Then, she made 3 prints of the heart to make a clover shape.
She added the stem, ground, and
some details with a paintbrush.

Doing vegetable and fruit printing was a fun process. Using peppers, apples, celery, and other fruits and vegetables yielded some interesting and pretty prints.

Vegetable Print Painting in Ag Class
The girls with other homeschoolers doing
fruit and vegetable printing.

Using hands and getting messy are the fun parts of painting for the girls.

Olivia Making a Handprint Christmas Tree
Olivia made a handprint Christmas tree.
She’s painting the tree trunk and snow with a paintbrush. 

In addition to creating their own images and work, they also enjoy using painting kits. Early on, they did some simple watercolor painting with pre-printed images.

Sophia Watercolor Painting
Sophia doing watercolor painting with pre-printed images.

When they were 7 and 9 years old, they each did a paint-by-numbers kit. These are not the kits that I grew up with which were substantially easier.

These kits had very tiny spaces, lots of blending of paints, and required much patience and time. The end-product is one that both the girls were so proud of and framed.

Olivia Painting by Numbers
Olivia doing a paint-by-numbers painting.

They each entered their paint-by-numbers paintings in the county fair and/or 4-H; and both did very well. Entering the paintings for 4-H (in Cloverbuds and Crafts) was a great way for the girls to share their experience about painting and what they liked/found challenging about the process.

Olivia with Cloverbud Judge
Olivia meeting with the 4-H Cloverbud judge
to discuss her painting.
She’s 7 years old in this picture.
Painting has been and will continue to be an important part of homeschooling. It’s been something the girls truly enjoy, and it gives them an opportunity to creatively express themselves.
Welcome to the Fun in the Summer Sun event!

Each Monday until September 7th
Mama to 4 Blessings along with Harvest Moon By Hand,
Adventures of Mommydom, Sweet Diva, and Sweet Phenomena
will be hosting Fun in the Summer Fun link up events.

Here’s the line up:

1st Monday of each month: link up your “Kid-friendly summer activities”
2nd Monday of each month: link up your “Kid-friendly summer crafts”
3rd Monday of each month: link up your “Kid-friendly summer recipes”
4th Monday of each month: link up your “How to stay cool in the summer heat”

*~*~*~*~*~*~*

With the temperatures rising this past week to a rather tropical level (dewpoints were in the upper 70s and low 80s and temperatures in the 90s making some days feel like it was 110-116 degrees), it’s a perfect week to look at ideas for cooling down. 

Make a Pinaqua

This idea is from the Family Fun June/July 2011 issue. This is a candy-free version of a pinata that is filled with water. To make it, fill a medium plastic trash bag with 1-2 gallons of water and knot the top.

Tie a rope or piece of twine beneat the knot. Toss the tree end of the rope over a tree branch and either tie it securly or have an adult stand by to raise and lower the pinaqua.

Pinaqua.

After being blindfolded and spun around three times, each player takes three whacks at the pinaqua with a broom. The winner is the one who manages to break the bag and unleash the wave.

Go Swimming

The girls enjoyed going swimming with a family friend on Wednesday. She took them to their favorite beach where they swam and played in the water for about an hour and a half. Afterwards, they enjoyed a little snack on the beach before coming back home.

Square Lake Beach.

Stay Indoors

On the hottest days when it literally felt like an oven outside, we chose to stay cool by staying indoors. The girls read and/or listened to books on CD, embroidered, played board games, practiced the piano and harp, did puzzles, and sewed doll clothes.

We also homeschool around the year (with a slightly more relaxed scheduled during the summer months), so they also worked on math, history, science/nature study, and government this week.

*~*~*~*~*~*~*~*~*~*

Now it’s your turn! What are some ways that your family stays cool during the summer?

This week, as part of our nature study, we focused on bats. We’re using the Handbook of Nature Study website which features different Outdoor Hour Challenges based on the book with the same name.  I used two different challenges on the website: Outdoor Hour Challenge #49 Bats and Outdoor Hour Challenge Summer Series #4 – Bats and the Sense of Hearing since each has different activities.

Throughout this post, three different typefaces are used:
– Bold – are words from the Handbook of Nature Study website.
– Italics – are words from the book titled Handbook of Nature Study by Anna Botsford Comstock.
– Regular – are my own words.

1. Read pages 241-245 in the Handbook of Nature Study. Although the lesson for bats states that it should not be given unless you can directly observe bats in person, I think this interesting creature deserves his own Outdoor Hour Challenge.

These are some points that were made in the book that I shared with the girls:

[The] wing [is a] thin membrane…equipped with sensitive nerves which inform the flier of the objects in his path, so that he darts among the branches of trees at terrific speed and never touches a twig.

Bat wings have raised domes which act as touch receptors.

The flight of the bat consists of darting hither and thither with incredible swiftness, and making sharp turns with no apparent effort.

[Bats]…catch insects on the wing for food. He makes a collecting net of the wing membrane stretched between the hind legs and tail, doubling it up like an apron on the unfortunate insects, and then reaching down and gobbling them up; and thus he is always doing good service to us on summer evenings by swallowing a multitude of insects.

The short fur of the bat is as soft as silk, and covers the body but not the wings.

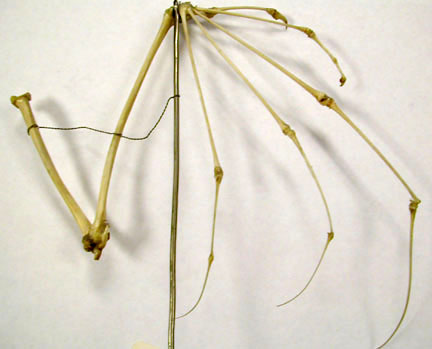
The plan of the wing is something like that of the duck’s foot; it consists of a web stretched between very much elongated fingers.

If a boy’s fingers were as long in proportion as a bat’s, they would measure four feet.

Since fingers make the framework, it is the thumb that projects from the front angle of the wing, in the form of a very serviceable hook.

\
Bat wing bone structure.

These hooks the bat uses in many ways. He drags himself along the floor…or he scratches the back of his head with them.

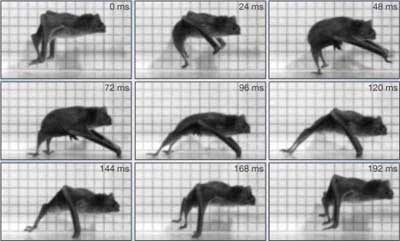
He is essentially a creature of the air and is not at all fitted for walking; his knees bend backward in an opposite direction from ours. This renders him unable to walk, and when attempting to do so, he has the appearance of “scrabbling” along on his feet and elbows

Bat walking using its wings/elbows to help move it along.

He uses his teeth to aid in climbing.

The little brown bat’s wings often meausre nine inches from tip to tip.

Brown bat flying with wings outstretched.

He does not fold [his wings] like a fan, but rather, like a pocket knife.

The tiny foot…is armed with five wirelike toes, tipped with sharp hooked claws. It is by these claws that he hangs when resting during the day, for he is upside-down in his sleeping habits, slumbering during the daytime.

The bat is very particualr about his personal cleanliness. 

He washes his face with the front part of his wing, and then licks his washcloth clean; he scratches the back of his head with his hind food and then licks the foot.  [To] clean his wings, he seizes the edges in his mouth and stretches and licks the membrane.

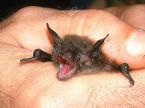
The bat has a voice which sounds like squeak of a toy wheelbarrow, and yet it is expressive of emotions.

He squeaks in one tone when holding conversation with other bats, and squeaks quite differently when seized by the enemy.

Little brown bat.

The mother bat…takes [her babies] with her when she goes out for insects in the evenings; they cling to her neck during these exciting rides; but when she wishes to work unencumbered, she hangs her tiny youngsters on some twig and goes back for them later.

The little ones are born in July and usually occur as twins.

During the winter, some bats hibernate like woodchucks or chipmunks. They select for winter quarters some hollow tree or cave. They do not awake until the insects are flying. Others migrate to the south with the advent of cold weather.

Hibernating bats.

2. Supplemental reading in The Burgess Animal Book for Children: Read Story 21. Use the illustration on page 128 to prompt a narration after reading the story about the Little Brown Bat.

The girls both enjoyed the story. There was one section about where bats will rest, and barns were mentioned. This, of course, made them think about how fun it would be to take flashlights and go the hayloft in the barn and see if they could spot any bats.

“Should we go at night? Like around 10 p.m.?” Olivia asked.

“No, they’d be outside eating bugs,” said Sophia. “Let’s go up during the day when they’d be hanging there.”

We went to the barn loft and I gave each of the girls a flashlight. They were so eager to shine their flashlights on the inside of the barn roof and find bats. 

Climbing on top of some old hay bales to find bats.

They walked the entire loft and then Olivia suggested they climb on top of some hay bales. Although they wanted to see bats, I couldn’t even begin to imagine what would happen if bats flew out from behind the wood pieces in front of them.

Looking for bats in the barn loft.

Since we didn’t see any bats in the barn, we headed to the pine trees in the front yard since I’ve seen bats flying around the trees at night. Again, we didn’t see any bats from the ground.

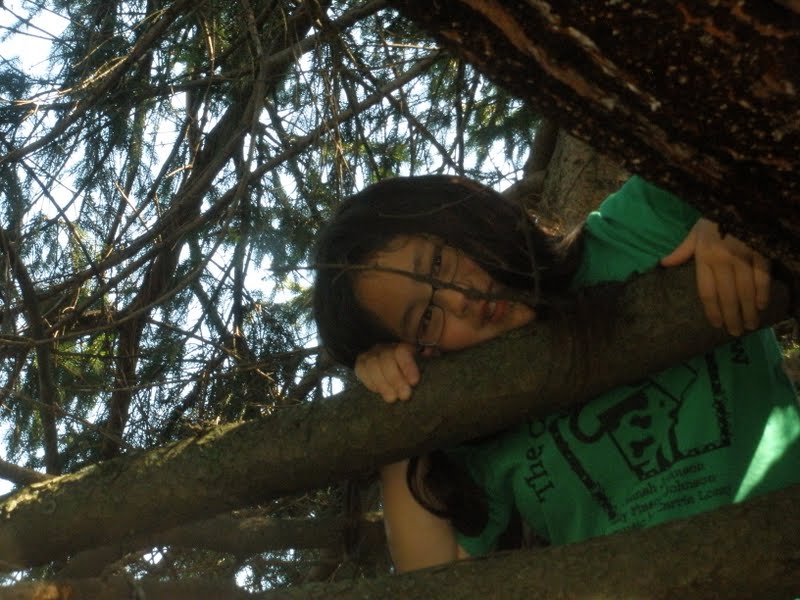
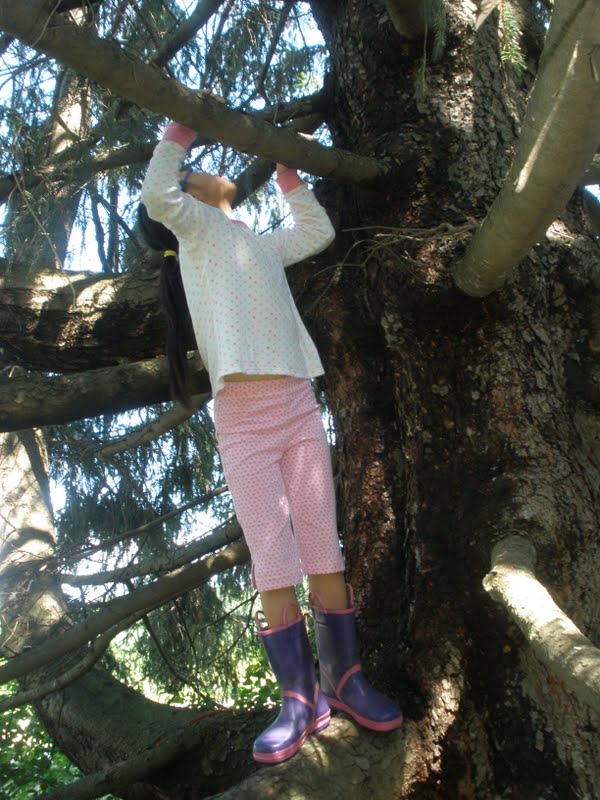
The girls even climbed one of the tallest pine trees to see if they could spot any bats.

Sophia enjoys climbing trees.
She said the pine tree had a lot of sap where she was standing.
She even spotted raccoon scat on one of the limbs.

If there are any bats in the front yard pine trees, they must be up near the top of them.

Olivia was determined to find at least one bat.

3. This week during your 10-15 minutes of outdoor time, look for any mammals in your neighborhood or in a near-by park. Many of us will not find any mammals to observe or signs of mammals like scat or tracks. This should not discourage us from taking the time to be outdoors with our children.

When the girls were climbing the front pine tree, Sophia spotted some raccoon scat. Near the base of the tree, there were parts of pine cones that the raccoon (s) didn’t want to eat.

Parts of pinecones that the raccoon didn’t want to eat.

Both of the girls were excited to have spotted evidence that there are other wild animals here that we don’t see during the day.

4. After your walk, discuss any interesting things that you observed. Help your child to find words for their experience. Record their words on paper and have them sketch a simple drawing for their nature journal.

Use some of the ideas that worked in the past like a rubbing of a leaf or feather. Take photos for your nature journals. Research and record what you learned about the bat this week from reading in the Handbook of Nature Study. One idea would be to sketch and record how a bat’s wings are different from a bird’s wings.

You could discuss why a bat is considered a mammal and how it differs from other mammals that we have studied. Keep it simple but make some connections this week.

The girls will be working on their nature journals and doing an entry about bats now that they saw the bats flying at night (see more information below).

*~*~*~*~*~*~*~*~*~*

Summer Series #4
Bats and Sense of Hearing – Train Your Senses

Sight: Observe the sky at sundown, look for the silhouettes of birds, bats, or insects in the air.

Hearing: Observe the sounds of the night starting at sundown: bats, crickets, frogs, bark of a dog, hoot of an owl, birds, rustling in the leaves, wind, etc. Can you hear more sounds on a damp night? Can you hear more sounds at night when your sense of sight is not as keen?

Inside Preparation Work – The reading from the Handbook of Nature Study is the same as above. There was another book reference “Discover Nature at Sundown,” but I didn’t have this book.

Outdoor Hour Time:

1. Things That Go Bump in the Night: Spend 15 minutes outdoors at sundown, observing some of the sounds suggested in the book. The book suggests observing sounds on a damp night and a dry night and comparing your results. Something else to listen for is “sudden silence” where the night noises completely stop and then start up again after a period of time.

Since we didn’t spot any bats during the day, we agreed that we would go out again when it was starting to get dark. So, around 8:45 p.m., we walked to the front yard.

The girls both heard frogs in the pond and pasture and birds in the trees. They said they felt a few rain drops and the wind.

We looked at the pine trees and walked up and down the driveway where the bats are often seen, but there wasn’t a single bat out at that time. I suggested that we come out again when it’s a bit darker…in about 15 minutes.

So, around 9:00 p.m. we went out again when it was much darker. It took a moment for our eyes to adjust from being in the light indoors to the dark outdoors. Yet, we could easily see everything outside after a few minutes. 

Again, Sophia and Olivia heard frogs calling to one another, but the birds had now quieted down. A new sound was apparent: mosquitos buzzing around our ears. 

Then…the first sighting!  “Bats!” the yelled enthusiastically and pointed up. 

Sure enough, the bats were flying within 3-4 feet of our heads. It was a great opportunity to see the bats up close and in flight.

Olivia and Sophia looking at the pine trees
where the bats were flying to and from around 9:00 p.m.

We walked to the pine trees again and saw that they were heading in and out of one of the trees more so than the others. Olivia began counting the number of bats she saw and got to 14.

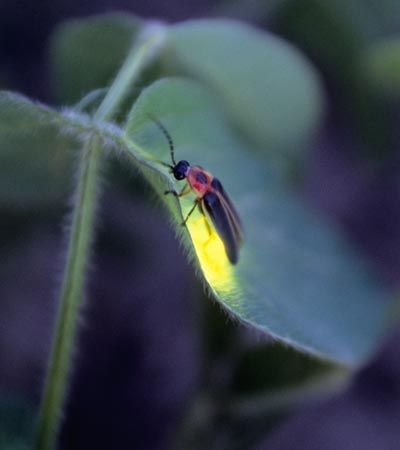
As we walked back to the house, I saw a firefly near the pasture gate. We walked over to where I saw it, and then the golden glow happened again, but closer to the girls this time.  Needless to say, they were thrilled!  They had never seen a firefly up close.

Firefly.

The more we looked, the more fireflies we saw around us. It was a wonderful time outside – seeing both bats and fireflies!

2. World of Bats:


“Although an occasional bat can be found flying about during the day, most bats take to the sky during the twilight hours. On a summer evening you can observe them in a dance of twists, spirals, and loops that is choreographed by the insects they pursue.” Discover Nature at Sundown, page 148

If you have the opportunity to observe some bats up close, make sure to use some of the suggestions from the Handbook of Nature Study and/or the Discover Nature at Sundown.

The girls were able to see quite a few bats fly and the variety within the flight pattern. Both were amazed at how quickly they flew.

Although some bats did fly relatively low (about 8-9 feet from the ground), the majority flew much higher (about 20-40 feet high).
Follow-Up Activity:

Make sure to give time and the opportunity for a nature journal entry.

Sophia and Olivia will work on their nature journal entry in the morning and recall their experience of seeing the bats flying around them.