Feeds:
Posts
Comments

Archive for the ‘Christmas’ Category

Even though I have multiple files filled with ideas for celebrating Christmas, I always enjoy looking at other ideas.

Last year, Sophia, Olivia, and I did a lot of cooking and baking.  We all enjoyed our time together in the kitchen trying new recipes – like these for chocolate cookies made in a waffle iron.

Calendar of Healthy Eating Ideas

This year, I’d like to incorporate some healthy foods into the Christmas season. One way to do this is by using the 25 Healthy Days to Christmas PDF from Nourish Interactive. The calendar has lots of great ideas that would appeal to both children and adults. 

Edible Christmas Tree

For a holiday gathering, this is a clever way to display fresh vegetables. The person who created the edible Christmas tree used a mix of cauliflower from the gardenia mix, broccoli, and boccoflower for a contrast of color.

Edible Christmas Tree.

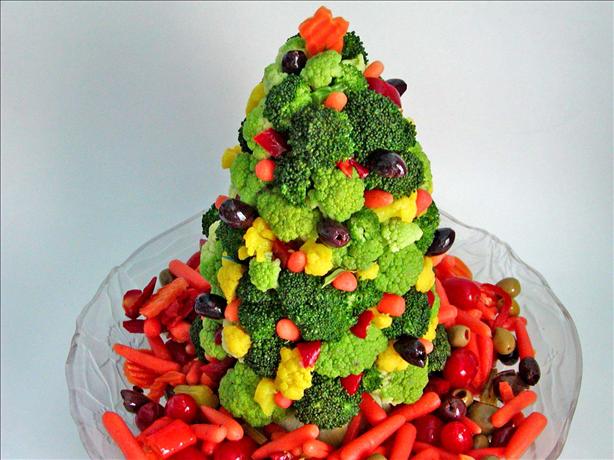
She recommends quickly blanching the broccoli and broccoflower heads for a few seconds in salted boiling water and then chilling them to brighten the color.

To assemble the edible Christmas tree, you need a Styrofoam cone and toothpicks. I would cover the cone with saran/clear wrap so none of the Styrofoam gets on the vegetables. Serve with a healthy dip on the side.

Muffin Tin Meals
After a busy day, sometimes it’s nice just to have a simple dinner or light snack. One of the ways to do this is to serve a meal in a muffin tin.

160
Christmas theme Muffin Tin Meal.
Photo Source

The muffin tins can be lined with a cupcake paper liner. Not only does this add some color to the meal, but it helps reduce clean-up time.

There are a variety of cutters available – either for cookies, appetizers, or bento boxes. These help reinforce the theme of the meal.

Doing a muffin tin meal in a trio of colors (red, green, and white) or single color would be another option that would be fun for a child to look at and eat.

Photobucket

Read Full Post »

With fresh tomatoes and basil ripe in the garden, it’s the perfect time to have a red, green, and white salad.  This recipe for Italian Tomato, Basil, and Mozzarella Salad is from Quick Free Recipes.

Italian Tomato, Basil and Mozzarella Salad
(serves 3)

Ingredients

3 beefsteak red tomatoes
Approximately 3 ounces fresh sliced mozzarella
1 handful of shredded basil leaves
2 teaspoons olive oil
Cracked black pepper (if desired)
Crusty bread to serve

Directions

1. Slice tomatoes crosswise into 1/2 inch thick slices.

2. Arrange each sliced tomato on each salad plate. Sprinkle the mozzarella on top of each tomato, then put the fresh basil leaves on top each tomato also.

3. Drizzle olive oil over the tops and add a dash of pepper. Enjoy! Serve with crusty bread.

Photobucket

Read Full Post »

Today I made gift and candy pouches from ribbon scraps.  I’ve made gift bags from fabric and fabric scraps that I have had on hand, but never ribbon pouches.

To make a ribbon pouch, you’ll need 2-3 inches wide ribbon scraps. Align ribbons, perhaps pairing sheers with solids so the treats will be visible. Pin the lengthwise edges together.

Two pieces of ribbon pinned together and ready to be sewed.

Trim ends with pinking shears, and stitch together lengthwise. 

Sew the ribbons together along the lengthwise edge.

Cinch one end of the pounch with narrow ribbon or yarn. Slip in mints, gumdrops, or peppermint sticks. Tie the other end.

Completed ribbon pouches.
I’ve been wanting to do this project for a long time now, but it seems like when the holiday season arrives this gets put to the bottom of the priority list. By crafting in July for Christmas, it’s a way to enjoy the process of creating…without the pressure of the holidays.

Photobucket

Read Full Post »

For the first day of White Christmas in July, I made an embroidered dove garland.  The doves’ bodies are cut from a felted wool blanket.

Part of the hand-embroidered, felted garland I made.
The doves are made from a felted wool blanket.

Each dove is embroidered with a simple Scandinavian design. I had hoped to trace the designs onto the bodies with a disappearing ink pen. No such luck. The felted wool sweater is so thick that even with the pattern on top of a light board, the image was impossible to see.

A few more designs on the doves.

All of the embroidered designs are free-handed. I looked at the designs and tried to replicate them as I went along.

The last four hand-embroidered doves.

To make the garland, the doves are evenly spead along a piece of ribbon.  Although I would have preferred to use another type of ribbon, I’ve been committed to using what I have on hand rather than purchasing new supplies. So I ended up cutting a narrow strip from a 2″ wide piece of a soft-textured, almost velvet-type ribbon. 

The garland by the woodstove.

Each dove is hand-sewn in place so it doesn’t shift when the garland is hung.

I’m happy to have the garland done and ready to be used in December when it will be time to decorate for Christmas. 

Photobucket

Read Full Post »

Pileated Woodpecker on Cherry Tree
Pileated woodpecker
looking for some food

I enjoy watching the birds visit the feeders – especially the flock of cardinals, the Northern Flicker, and variety of woodpeckers.

Sophia and Olivia also like watching the birds and tracking how many and what type visit the feeder.  Sometimes they’ll even do a bar graph to visually show which birds were the most popular at the feeder during a given time period. (This is a great homeschooling nature/science + math activity.)

So, last month I was reading a past issue of Birds and Blooms magazine, and saw an article about making holiday gifts from your backyard. One of the ideas I liked was making birdseed treats.

Using cookie cutters or muffin tins, you can offer food to the birds while decorating at the same time!

Birdseed Treats
Birdseed treats packed with seed mixture and
chilling in the mudroom
(which is colder than the refrigerator at this time of year)

Birdseed Treat Recipe
(Recipe from Angie Dixon)

1/3 cup gelatin
1-1/2 cups water
8 cups of birdseed

Mix gelatin and water on low until gelatin is melted and clear. Remove from heat and stir in 8 cups of birdseed. Stir until it is well mixed and there is no dry seed. Fill cookie cutters with the seed mixture and pack tightly. Then refrigerate for 2 to 4 hours. Dry on baking rack for 3 days.

Note:  If you plan on hanging the treats (rather than just putting them in a suet feeder), make sure you put a hole and string/yarn where you want it before the shape is completely dry.  Otherwise, it is much more difficulty and likely to break.

Birdseed Treats in Tins
Birdseed treats in muffin tins –
a good size for filling suet feeders

Another idea presented in the same article was to make a birdseed wreath.  I didn’t do this, but thought it is worth mentioning.  Perhaps I’ll do this another time this winter.

Birdseed Wreath

To make a wreath, combine the same ingredients used to make the birdseed treats. But instead of using cookie cutters, press the mixture into a miniature Bundt cake pan or another rounded mold. Refrigerate for 4 hours, then carefully remove from the mold. Let it dry overnight, then decorate it with edibles. Or dress it up with raffia, large accents, ribbon or bows.

Black Capped Chickadee on Feeder
Black-capped chickadee eating some of the
Amish bird suet I make regularly

If you would like to see the pictures that were in the Birds and Blooms magazine, you can visit the magazine’s website HERE.

Female Red-Wing Blackbird at Feeder - I Think
There was a large flock of these birds which aren’t normally here.
I’m not sure the type of bird.  Any ideas?

Read Full Post »

Olivia woke up by 6:00 a.m., eager to open her Christmas stocking that was filled by Santa. Lucy, the cat, was interested as well in what Olivia received.

After stockings were opened, we had a simple breakfast of homemade cinnamon rolls or cinnamon-raisin rolls that I made on Christmas Eve.

The cinnamon rolls are made from a recipe that was created my mom’s mother who was a baker. Thankfully, one day she agreed to measure the ingredients for her rolls. I wrote the recipe down as she made the rolls. It is a recipe that we’ve enjoyed many years now.

After breakfast, the girls checked out again the table where they left the letters to Santa.  This year was particularly interesting for them because Sophia had a tooth pulled this week, and she put her tooth out for the tooth fairy right next to the plate of cookies and water for Santa.  Clearly, the tooth fairy and Santa had fun seeing each other because the table was covered with confetti and fairy dust:

The aftermath of Santa’s and the Tooth Fairy’s party.

The girls each opened one present from Santa before heading to my mom and dad’s home where we celebrated with my family. This is my mom and dad at Christmas dinner:

We came back home in the afternoon, rested a bit, had a light dinner, and then opened presents under the Christmas tree.

Sophia taking a break from opening gifts.

There was lots of laughter and happiness today. Hearing “This has been the best Christmas ever!” made me very happy. I think doing daily activities leading up to Christmas helped make this year extra special, and create lasting memories for us all.

Read Full Post »

{this moment} – A Friday ritual (inspired by soulemama). A single photo – no words – capturing a moment from the week. A simple, special, extraordinary moment. A moment I want to pause, savor, and remember. If you’re inspired to do the same, leave a link to your ‘moment’ in the comments.

Wishing everyone a lovely weekend!

*** *** ***

Read Full Post »

Christmas Eve is filled with annual traditions and routines that the girls look forward to doing.

In the late-afternoon, the girls sang in the church choir. The music during the service was beautiful. Afterwards, we drove around a bit and enjoyed seeing Christmas lights.

After feeding the horses and dogs, we ate dinner and had a peppermint ice cream dessert.

Here’s the recipe for Peppermint Angel Roll:

1 package (16 ounces) angel food cake mix
1 tablespoon confectioners’ sugar
1/2 gallon peppermint ice cream, softened
1 jar (11 3/4 ounces) hot fudge ice cream topping, warmed
Miniature candy canes and additional confectioners’ sugar, optional

Prepare cake batter according to package directions. Line a greased 15″ x 10″ x 1″ baking pan with waxed paper and grease the paper.  Spread batter evenly into pan.  Bake at 350 degrees for 15-20 minutes or until cake springs back when lightly touched.

Cool for 5 minutes.  Turn cake onto a kitchen towel dusted with confectioners’ sugar.  Gently peel off waxed paper.  Roll up cake in the towel jelly-roll style, starting with a short side.  Cool completely on a wire rack.

Unroll cake and spread ice cream over cake to within 1/2 inch of edges.  Roll up again.  Cover and freeze until firm. 

To serve the dessert, I cut slices and put some hot fudge on top. The recipe called for crushed peppermint sticks sprinkled on top, but I figured that was more than enough sugar…and I needed the girls to fall asleep early.

Peppermint Ice Cream/Cake Dessert

After dinner, we checked Santa’s progress on the computer. He was in the Canary Islands, and was fast approaching the United States. The girls stepped up their pace and wrote a letter to Santa:

Sophia’s Letter to Santa

The girls put cookies and water on the table along with their letters.  They don’t put milk or juice out because they “could spoil and then Santa would get sick…and that wouldn’t be good” as they remind me each year.

They cut up carrots and put them on the mudroom roof for Santa’s reindeer.  They wanted to throw the carrots out on the mudroom roof. I highly discouraged them from doing this because they “might get buried in all that snow….perhaps it might be easier if they were in the bowls so the reindeer can find the carrots.” Thankfully, they agreed.

Carrots on the roof for Santa’s reindeer.

Before going to bed, they each opened one present that was under the Christmas tree.

Sophia opening a gift from an uncle and aunt.

The girls went to bed by 8:30…and were asleep by 9:00.  Santa visited around 1:00 a.m.

Read Full Post »

Today I took a break from preparing for Christmas with Sophia and Olivia, and spent the day helping my parents. My father has Alzheimer’s Disease and my mom has multiple health issues – the most challenging of which is mobility and vision problems. Needless to say, they needed some help with last-minute holiday preparations.

In addition to picking up meat for Christmas dinner, doing their grocery shopping, and helping do some work around their home; I took my dad to his quarterly medical appointment at the Senior Care Clinic at Hennepin County Medical Center. He has seen his doctor there since May 2009 when he was diagnosed with A.D.

This appointment, though, was very different from the past ones. My dad had substantial tangential thoughts, was unable to directly answer most questions, and struggled to find the words for many basic nouns (e.g., garage, gloves).

It was painful to watch…and quite sobering when the doctor said that the time has come to stop driving. This is a major challenge since my mom is unable to drive.

His doctor also recommended that he begin an adult day program 2-3 times per week. This is something that I’ll need to help him see the benefit of doing.

Despite the depressing news, my dad and I enjoyed lunch together before the appointment. There were moments where his mind was completely clear and it was like having my father “back” for some time…and other moments where it was hard to hold back the tears as he needed guidance about how to eat a hamburger…and I had to help feed him.

When we came back from the appointment, I had to share the news with my mom. It was one of the more difficult things I had to do. The timing could not be worse…just a couple days before Christmas.

On a more positive note, I brought some treats for my parents to enjoy on Christmas (or before…if they wanted to sample some). Here’s one of the favorite treats from the dozen or so bags of desserts I brought them:

Mint Capped Brownie Cookie Cups
(Hershey’s)

(Note: I baked these in a couple of smaller dishes and put the Mint Truffle Kisses in rows/columns so each piece had one Kiss on it.)

48 Mint Truffle Hershey Kisses
2/3 cup butter, softened (I used dairy-free butter)
1 1/4 cups granulated sugar
1 tablespoon water
1 teaspoon Watkins vanilla extract
2 eggs
1 1/2 cups flour
1/2 cup Hershey’s cocoa
1/2 teaspoon salt
1/4 teaspoon baking soda
powdered sugar

1. Preheat oven to 350 degrees. Line 48 small muffin cups (1 3/4 in diameter) with paper or foil baking cups. Remove wrappers from chocolates.

2. Beat butter, sugar, water and vanilla in large bowl on medium speed of mixer until well blended. Add eggs; beat well.

3. Stir together flour, cocoa, salt and baking soda. Gradually add to sugar mixture, beating on low speed just until blended. If necessary, refrigerate dough until firm enough to handle. Shape dough into 1 inch balls; place in prepared muffin cups.

4. Bake 11 t o13 minutes or until cookie surface is set. Cookies will appear soft and moist. Do not overbake. Cool about 5 minutes on wire rack. Press chocolate kiss into surface of each cookie cup. Cool completely in pan on wire rack. Sprinkle each cookie with powdered sugar (I didn’t do this). Makes 4 dozen cookies.

Read Full Post »

Today’s activity was to put handmade cards and a plate of cookies in the mailbox for Dave (the mailman).

The girls picked out some cookies and candies they made and put them on a plate. Each had made Christmas cards, so they picked out one each and included that with the gift to Dave.

He wrote the girls a note thanking them for the cookies, and said they looked delicious. They were so happy to do this and to know that Dave liked their gift!

Read Full Post »

Older Posts »