Feeds:
Posts
Comments

Archive for the ‘holiday’ Category

Today I made gift and candy pouches from ribbon scraps.  I’ve made gift bags from fabric and fabric scraps that I have had on hand, but never ribbon pouches.

To make a ribbon pouch, you’ll need 2-3 inches wide ribbon scraps. Align ribbons, perhaps pairing sheers with solids so the treats will be visible. Pin the lengthwise edges together.

Two pieces of ribbon pinned together and ready to be sewed.

Trim ends with pinking shears, and stitch together lengthwise. 

Sew the ribbons together along the lengthwise edge.

Cinch one end of the pounch with narrow ribbon or yarn. Slip in mints, gumdrops, or peppermint sticks. Tie the other end.

Completed ribbon pouches.
I’ve been wanting to do this project for a long time now, but it seems like when the holiday season arrives this gets put to the bottom of the priority list. By crafting in July for Christmas, it’s a way to enjoy the process of creating…without the pressure of the holidays.

Photobucket

Read Full Post »

For the first day of White Christmas in July, I made an embroidered dove garland.  The doves’ bodies are cut from a felted wool blanket.

Part of the hand-embroidered, felted garland I made.
The doves are made from a felted wool blanket.

Each dove is embroidered with a simple Scandinavian design. I had hoped to trace the designs onto the bodies with a disappearing ink pen. No such luck. The felted wool sweater is so thick that even with the pattern on top of a light board, the image was impossible to see.

A few more designs on the doves.

All of the embroidered designs are free-handed. I looked at the designs and tried to replicate them as I went along.

The last four hand-embroidered doves.

To make the garland, the doves are evenly spead along a piece of ribbon.  Although I would have preferred to use another type of ribbon, I’ve been committed to using what I have on hand rather than purchasing new supplies. So I ended up cutting a narrow strip from a 2″ wide piece of a soft-textured, almost velvet-type ribbon. 

The garland by the woodstove.

Each dove is hand-sewn in place so it doesn’t shift when the garland is hung.

I’m happy to have the garland done and ready to be used in December when it will be time to decorate for Christmas. 

Photobucket

Read Full Post »

I’ve been enjoying the past four weeks of The Summer of Color challenge. Week 5 is no different.  This week’s color is brown, and I made three origami window stars as well as completed two more squares for my Summer of Color quilt.

Window stars that I made with brown translucent paper.
Each of the star points is folded multiple times and glued. Then, the points are attached to one another to reveal the window star’s pattern.
I’ve made this pattern before, but never in brown.
It’s interesting how different color paper
can completely change the look and feel of the window stars.

The sun was particularly bright on Sunday afternoon. With a 68% humidity level and temperature in the upper 80s, it felt quite tropical outside. And, to think, about two months ago there was snow on the ground. With the sun so bright, it almost makes the window star points glow.

This would be a good window star to
put up around autumn or Thanksgiving.
The quilt is coming along. I have ten 12-inch squares done which is good.
Ten quilt squares are done.
My goal is to use only fabric that I have on hand rather than buying new fabric.
For each of the quilt squares, there are seven different fabrics used.
Seven represents the number of days in the week.
I’d like to use the fabric that I’ve had for some time now and put it to good use.
This is not the order the squares will be in for the quilt.
I’m going to have a plain-colored piece of fabric in between each
row and column to break up the squares.
(Yes, that’s a dog nose in the upper right hand corner of the picture.
Montague is resting near the quilt squares.)

Read Full Post »

On 5 Kids and a Dog, there’s a series called the ABCs of Homeschooling.  This week’s letter is “M.” 

Alphabet ATC or ACEO Available - Needlefelted Letter M…is for Math.

I remember sitting in a college calculus class and one of the students asked, “When are we ever going to use this in real life?”

The professor gave an answer that I wished some of my junior high and high school math teachers would have said when I was learning algebra and trigonometry, “Chances are, you’re never going to use this in your daily life. This level of math isn’t so much about using it in ‘real life.’  It is more about being persistent and disciplined, and finding the answer to a problem.” 

Math comes down to simple problem solving; and training one’s brain to be able to think through a variety of situations and get to the right answer or come to a conclusion. Math, to me, means essentially fostering a sense of determination and commitment to finish something you’ve started.

Because math goes beyond just learning numbers, functions, and concepts, I try to give Sophia and Olivia opportunities to learn math through a variety of methods: traditional/book learning, singing, learning tools, games, and real-life application.

TRADITIONAL/BOOK LEARNING

The girls learn core math concepts and facts by using their math books.  I use Rod & Staff books since both girls say they like them.  At the last homeschool conference I attended, I looked at a variety of math books. Some had a lot of color and impressive graphic design; some used the computer; and others used DVDs to teach math.  After looking at the variety of resources, I decided to stick with Rod & Staff.

Rod & Staff isn’t fancy – the text and images are all in black and white.  However, the majority of examples they use all tie into agriculture, farm animals, and cooking/baking – all things that are quite applicable to the girls’ life right now.

Sophia's Math Book
Sophia’s fourth grade math book. 

There seems to be a lot of repetition with some of the fundamental concepts and facts (e.g., addition and subtraction facts, skip counting by 2s/5s/10s, multiplication and division facts). However, knowing these facts by memory is critical to forthcoming math skills, so I think that’s valuable.

That being said, once the girls have “mastered” a skill, I don’t make them continue doing pages of the same thing. They can move onto the next skill. That’s one of the benefits of homeschooling – adapting the lessons to the each child’s skills and knowledge.

Olivia Doing Math with Shells
Olivia likes to use manipulatives to help her visualize
some of the math problems she’s doing.
For this lesson, she chose to use shells.

SINGING

The girls both enjoying singing and seem to retain information much better when they learn it by listening to and singing songs. 

Some of the CDs that the girls use for math.

Some of the CDs for math that they use include:

Shiller Math Songs – this was a CD that Olivia used a couple of years ago when using the Shiller math curriculum.  There are a variety of songs that had her moving about while listening to instructions on the CD.

Addition Songs by Kathy Troxel – this CD comes with a songbook/workbook, and has helped Olivia learn counting from 1 to 20 as well as all the addition facts from 1+1 to 9+9. There are sing-along songs as well as echo-style songs for self-testing.

Multiplication Songs by Kathy Troxel – this CD also comes with a songbook/workbook, and has helped Sophia learn all the multiplication tables 2 through 12.  There are sing-along songs as well as echo-style songs for self-testing.

  One Hundred Sheep by Roger Nichols – There are nine songs on this CD that teach counting by 2s, 3s, 4s, 5s, etc. This skill is known as “skip counting” and is used in every math process from multiplication to algebra.  The songs use stories from the Gospels as a basis for the lyrics.  Both the girls use this CD.

Sophia singing along with the
One Hundred Sheep CD.

LEARNING TOOLS

Dice

Olivia playing with some of the math dice.

One of the ways to learn and/or review the basic facts is by using dice. 

Basic math equation that Olivia put together
using three different types of dice.

I have a variety of dice that the girls can use.  Some have the basic six dots representing numbers on them (white ones).  Others are special ones:

– Blue dice with the numbers 1-6 on them.
– Green dice with the numbers 7-12 on them.
– White dice with different symbols (e.g., plus, minus, times, divided by).
– Yellow dice with Roman numbers.
– Big red and orange dice with little white dice inside it. Both the dice have the traditional 1-6 dots on each side.

A variety of dice to use with math games.

Electronic Flash Cards

Learning Resources has a Minute Math Electronic Flash Cards in which the girls are presented with different facts (e.g., 2+9, 8×7) and need to type in the answer. The “game” is based on speed and accuracy. There is a voice that tells the player if she typed in the correct answer.

Sophia testing herself on multiplication facts.

Sophia likes this “game,” but Olivia finds it frustrating.  So, when Sophia needs/wants to do something different for math, she’ll use the Electronic Flash Cards.  

Learning Wrap-Ups

Both the girls learn best when there is a hands-on component to the lesson.  One of the things that I found at the last homeschool conference was a set of Learning Wrap-Ups. Each Wrap-Up focuses on a different process (e.g., addition, subtraction, multiplication, division). 

Olivia testing herself on addition facts.

To use them, the girls start with the first number on the left side and add/multiply it by the number in the middle of the key.  Then they find the answer on the right hand side and bring the yarn to the other side and wrap it around the backside before bringing it to the second number on the left side. They repeat the process until all the numbers and answers have been wrapped.

Olivia with the finished Wrap-Up.
The string was where it should be on the back,
so she got all the answers correct.

The Wrap-Up is self-checking on the back. The key has a raised pattern to show where the yarn should be. If the yarn matches the pattern, then all of the answers were done correctly.

GAMES

The girls have many games that they enjoy playing that have a math component to them:  Horse-opoly, Life, and Farm-opoly.

Farmopoly - Homeschool Math Lesson
The girls playing Farm-opoly.

In addition to purchased games, we’ve also made our own math games.  For Thanksgiving, we made a turkey racing game (see below) that involved counting and probability.  The girls had fun making and playing the game, and having it be a part of Thanksgiving activities in the future.

Turkey Racing Game
Homemade math game.

REAL LIFE APPLICATION

Bringing math into everyday activities provides the girls with a learning experience in a real-life setting, and helps enhance comprehension of what they are learning.

Counting by 5s and 10s
Sophia learning to skip count
by 5s and 10s using buttons.

An early math skill is sorting, although it is one that people use in their daily lives. One of the ways that sorting was incorporated into homeschooling is through stamp collecting.  The girls each have their own books for stamps, and have enjoyed sorting them into categories (e.g., horses, flowers, pandas, wild animals).

Olivia Working on Her Stamp Collection
Olivia sorting through stamps when she was very young. 
She still has and adds to her stamp collection.

Another way that the girls have used math is when they have sorted items to donate.  Each year we do Operation Christmas Child.  The girls enjoy choosing items to put in the boxes, and then dividing and sorting them at home. 

Olivia and Sophia Sorting Operation Christmas Child Items
The girls sorting items for Operation Christmas Child boxes.

Of course, each October the girls look forward to sorting candy they get when they go out for Halloween.  They will compare what each one got, and often will trade candy.

Olivia Sorting Halloween Candy
Olivia with candy she sorted.

Math also is used when studying science. 

Sophia Measuring the Jaw
Sophia measuring the length of a bone.

One of the easiest ways to tie the two subjects together has been when we have been able to measure something tangible (e.g., feathers, depth of a woodpecker hole in a tree, the circumference of a tree, the length of a bone).

Sophia Measuring Snow Depth
Sophia measuring the snow depth.

The girls enjoy cooking and baking.  Reading a recipe and then measuring the ingredients is something that I have involved them in well before they were doing their math books.

Making a Strawberry Smoothie
Sophia measuring and adding an ingredient
to make a fruit smoothie.

I’ve had a food scale for many years, and it seems like in the past few years that it has been used more frequently by the girls – whether they are making food in the kitchen or weighing an item for a science lesson.

Girls Putting Mushrooms on Scale
The girls were weighing some mushrooms they found
on the nature trail.
Sophia Measuring and Weighing  Rhubarb
The girls are cutting and measuring rhubarb
to make dessert.

Money is something that the girls have enjoyed learning about in math.  Rather than just using pictures in math books, the girls receive a bit of money for doing some chores.  They also receive money periodically as gifts from grandparents and relatives. 

Originally, I had the girls set up save-spend-give jars and a percentage of each amount they earned or was gifted was divided into the three jars in a 50-40-10 percent ratio (respectively).  Now, I have them do a 50-50 split – save half/spend half.  Of the spending money, some they use as donation money. 

The girls have their own wallets with money and gift cards, and have learned to interact with cashiers; and vendors at craft shows and farmer’s markets. They have to learn to use only the money they have available (no loans or borrowing money). This has taught them the value of budgeting and patience (especially if they need to save for a larger item). I’m hoping that they carry this into their adult life and save half of what they earn.

Read Full Post »

Each month the Unique Women in Business (UWIB) team does blog hop. This month’s theme is “Red, White, and Blue.”

What immediately comes to mind for me is the 4th of July (also known as Independence Day).  There are plenty of parades, picnics, fireworks, and other events to celebrate the day.  But why are we celebrating it?

According to the History.com website:

July 4th has been a federal holiday in the United States since 1941, but the tradition of Independence Day celebrations goes back to the 18th century and the American Revolution (1775-83).

In June 1776, representatives of the 13 colonies then fighting in the revolutionary struggle weighed a resolution that would declare their independence from Great Britain. On July 2nd, the Continental Congress voted in favor of independence, and two days later its delegates adopted the Declaration of Independence, a historic document drafted by Thomas Jefferson.

From 1776 until the present day, July 4th has been celebrated as the birth of American independence, with typical festivities ranging from fireworks, parades, and concerts to more casual family gatherings and barbecues.

What are some ways to create a festive environment at home to celebrate the 4th of July? 

Reusable Fabric Bunting

This year, I made some red, white, and blue buntings to decorate the home and yard.  I made some extra ones that are available in my shop, Harvest Moon by Hand.

Red, white, and blue bunting
available at Harvest Moon by Hand.

Table Runner

In a past issue of Home Companion magazine, there was a picture of a table runner made from kraft paper that had flowers and circles cut from decorative paper sewn on with red thread.  I thought it would be nice to have something special for the table that is a bit more permanent.

So, I picked out tan linen fabric, red thread, fabric in red, white, and blue patterns. I cut out different sizes of circles and then sewed them randomly onto the fabric.  After that, I hand-embroidered each circle onto the fabric using the blanket-stitch.

Hand-embroidered table runner
with red-thread accent lines.

Origami Centerpiece

My daughters and I made this centerpiece by making origami cranes from scrapbooking paper, and punching circles from red, white, and blue scrapbooking paper.  We hung the cranes and circles on branches that were placed in a vase.  There are red and white glass pieces at the bottom of the vase.

Vase with Origami Cranes
Vase with origami cranes and
red, white, and blue paper ornaments.

Window Stars

I also like to decorate with red, white, and blue window stars.  There are many different patterns available at Harvest Moon by Hand including the trio of stars below.
The red, white, and blue window stars are available here:

If you would like to see what other women on the UWIB team created for the Red, White, and Blue Blog Hop, please visit the websites below:

Read Full Post »

On 5 Kids and a Dog, there’s a series called the ABCs of Homeschooling.  This week’s letter is “K.” 

Alphabet ATC or ACEO Available - Needlefelted Letter K…is for Kitchen.
When I think of homeschooling, one of the places that we spend a considerable amount of time in is the kitchen.  The girls and I enjoy cooking and baking, so incorporating a culinary aspect into homeschooling is a natural fit.
The girls have been helping in the kitchen since they were about 18 months old.  As they have gotten older, the new skills they learn match their developmental and physical abilities. 
Both Sophia and Olivia will look at recipes as I’m planning meals for the upcoming few weeks.  When I’m doing this, they often will look at the pictures that accompany the recipe (the majority of my recipes come from cooking and women’s magazines).  They’ll see a picture of something that looks good and will ask if they can make it. 
Trying a new recipe, having it be a part of the meal, and seeing what it tastes like is something that makes the girls happy and proud.
Olivia with Pumpkin Pie
Olivia holding a pumpkin pie she made.

During the past few years, I created an ABC Journey Around the World in which the girls learned about a different country in alphabetical order (e.g., Australia, Brazil, China, Denmark, Egypt, France, and so forth until ending with Yemen and Zambia). 

One of their favorite parts of learning about other countries was seeing what people would eat in different parts of the world.  I found recipes on the internet as well as through recipe books from the library. We tried anywhere from one to six recipes per country (some were easier to find recipes for than others).

Making Mexican Hot Chocolate
The girls made Mexican hot chocolate
using a recipe found in a children’s cookbook.
They also made Mexican scrambled eggs
that morning for a complete breakfast.

French Green Bean Recipe
Sophia is holding a green bean sidedish
using a French recipe. 

Olivia Making Swedish Rolls
Olivia is making Swedish cinnamon rolls.
The recipe came from a local church cookbook
that had a whole section on Swedish cooking
(we live in a community that was founded
by Swedish immigrants).

The kitchen is more than a place to cook and bake food.  With homeschooling, the kitchen also becomes an area to do science experiments and hands-on activities.

One of the science lessons that the girls did focused on marine life and pelicans. Apparently a pelican can hold 13 1/2 quarts of water in its pouch. The water drains out, leaving only the fish which the pelican then can swallow and eat.

Sophia Being a Pelican
Sophia trying to catch a marshmallow
as part of a science lesson about pelicans.

In the photograph above, there are 2 marshmallows in the sink representing fish. Sophia’s job is to catch the marshmallows. It’s harder than it looks.

The girls learn best when they can make a hands-on, tangible connection with the subject about which they are learning.  This is so important when the concept might be more difficult for them (e.g., electricity) or would benefit from a visual example (e.g., lung capacity).

Lung Capacity Experiment
Olivia learning about lung capacity.
She took a deep breath and then blew air through the tube
that led into the water-filled 2-liter pop bottle.
The air would push out the water from the bottle
and show how much air was in her lungs.

Sometimes when we’re cooking, the girls learn new words or make a connection between what they’re cooking with something else they’ve heard or learned.  For example, when we were making cheese, the curds separated from the whey.  They immediately made the connection with the nursery rhyme they had heard many times:

Little Miss Muffet sat on a tuffet
Eating her curds and whey,
Along came a spider,
Who sat down beside her
And frightened Miss Muffet away.

Cheesemaking - Curds Separating from Whey
Learning to make cheese.  In the process,
the girls saw the curds and whey separate; and
made the connection of a nursery rhyme they heard.
(The curds are the white part; the whey is the liquid.)

For one nature study, we focused on learning about dandelions.  In addition to the science part of the study, we added a culinary component where we made dandelion cookies, dandelion vinegar, and dandelion oil/salve.

Making Dandelion Oil for Salve
Olivia making dandelion oil.
The oil can be used as a base to make salve.

The kitchen also is a place where the girls create things for the holidays and different seasons. 

Borax Snowflake - Step 3 - Sophia
Sophia making borax snowflakes.
Homemade Marshallows for Valentine's Day
Olivia holding homemade marshmallows
she made for Valentine’s Day.

Gretel Waiting for Pumpkin Guts
Sophina carving a pumpkin while Gretel looks on.

An important part of our time in the kitchen is when we make food to help others.  We have made many meals and desserts for people experiencing medical/health challenges; and have chosen to donate some of our food to those in need. 

Cereal to Donate
The girls packaging up some of food to donate
to an organization that serves people who are homeless.

We also make food for animals – treats for the dogs, cats, and horses; and for wildlife.  Making food for the hummingbirds to drink during the summer and suet for the birds during the winter are regular activities. 

Sophia Helping Make Bird Suet on a 25 Degree Below Zero Day
Sophia making suet for the birds on a
very cold 25 degree BELOW zero day.
Needless to say, the birds needed the energy
and were constantly eating the homemade suet.

Seeing how excited the animals are to get a treat…and to see the variety of birds that now visit the feeders is a lot of fun.  Being able to observe animals up close (especially birds) is such a highlight of homeschooling.
So many subjects are covered in the kitchen beyond home economics – reading, math, science, community service, and geography. The kitchen truly is one of the centers of learning for homeschooling…and one of our favorite places to learn! 

Read Full Post »

Welcome to the second time of our Fun in the Summer Sun event!

Each Monday until September 7th
Mama to 4 Blessings along with Harvest Moon By Hand,
Adventures of Mommydom, Sweet Diva, and Sweet Phenomena
will be hosting Fun in the Summer Fun link up events.

Here’s the line up:
The 1st Monday of each month: link up your “Kid-friendly summer activities”
The 2nd Monday of each month: link up your “Kid-friendly summer crafts”
The 3rd Monday of each month: link up your “Kid-friendly summer recipes”
The 4th Monday of each month: link up your “How to stay cool in the summer heat”

*~*~*~*~*~*~*

With the Fourth of July right around the corner, Sophia, Olivia, and I focused on creating crafts and decorations for the holiday.  I decided to take a Chinese spin on the holiday this year since there’s a Chinese connection with a symbol associated with the Fourth of July:  fireworks.

According to the Minnesota-China Connection website, “You may think that fireworks are as American as the Fourth of July, but we would not have them without Chinese inventiveness. The first fireworks might have been an accident. Legend tells that a cook discovered the ingredients for black powder, and quickly the Chinese were entertaining themselves with beautiful displays in the night sky.”

Also, origami (or paper folding) has ties to China.  Both China and Japan are countries that have a long history associated with origami.  This timeline shows the history of origami and paperfolding throughout the world.

With both Sophia and Olivia being adopted from China, having opportunities to link their birth- country and culture with American holidays and traditions, is important.

Here’s what we did:

Origami Crane Ornaments

Bare branches decorated with red origami cranes
and red, white, and blue circles.

We made crane ornaments from red scrapbooking paper as well as red, white, and blue circles (also from scrapbooking paper).  Hangers for the cranes and circles were made from a double-length of thread. 

At the bottom of the base, we put clear/white and red marbles.  Then, we inserted several bare branches.  The girls put the origami cranes and circles onto the branches. 

Sophia putting circle ornaments on the
origami crane tree.

Here are the instructions for making an origami crane:

The painting in the background behind the origami crane tree was hand-painted in China – not with a brush but entirely with his hand and fingernail.  The artist used the side of his hand or tip of the fingernail dipped in ink to create the image.  There was no design or pattern used to create the image – he just painted as he went along.  It’s a fascinating process to watch. 

Decorated Bags for Collecting Candy

A few bags that the girls made to collect candy
during the 4th of July parade.
I guess they wanted a spare bag just in case they
get a tremendous amount of candy.

Each year, we go to a parade on the 4th of July, and it seems like there’s always candy being thrown to the children.  The girls like to bring a little bag to collect the candy they pick up, so we made these bags from a variety of decorative papers and paper with Chinese printing/characters. 

The paper with Chinese characters on it is from a little booklet given out at a hotel in China.  It is from the last hotel we stayed in before heading back to the United States when Olivia was adopted.  It was in a collection of items that were brought back from China to show her when she was older.

The girls decorating brown bags with
scrapbooking paper and paper from China.

Origami Edibles

This idea came from the May 2011 issue of Family Fun.  Instead of crafting with paper, you craft with food and are able to eat it afterwards. For geometric wraps, simply trim flour tortillas into squares, spread them with fillings (e.g., peanut butter and raspberry jam; cream cheese and blueberry jam).  With red, white, and blue fillings – you have a great tie-in with 4th of July.

Olivia spreading peanut butter on
a whole-wheat tortilla. 
You could use a white tortilla
to make it fit the red, white, and blue theme.

For a puppy face treat, fold a square tortilla in half on the diagonal and then fold two corners in and down to make the ears.  You can make a face on the tortilla with fruit from the jam, olives, or food markers.

Sophia made a puppy PB&J sandwich
and used blueberries from the homemade jam
for eyes and a nose.
You can fold the tortillas any way you want – be creative!  Just make sure that you don’t put too much peanut butter, jam, or other filling on the tortilla or it won’t be able to fold properly.  Either that…or it will ooze out.  And that just doesn’t look as appetizing compared to treats with all of the contents inside them.
Sophia folded another sandwich in a different way.
It is kept closed by the stickiness of the peanut butter
(on the inside) and two strawberries from the jam
on the outside.

Besides getting ready for the 4th of July, the girls also worked on a couple of sewing and needlework projects this week.  Sophia made a lap quilt by trying six new quilting square patterns:

Lap quilt that Sophia made.
She learned six new quilting patterns.

Olivia looked through my sewing and embroidery patterns folder, and found a pattern to make a donkey.  The directions recommended sewing the donkey on the sewing machine, but Olivia wanted to sew it by hand using embroidery stitches she knew. 

Olivia using the blanket-stitch to sew her donkey. 
She completed it in less than a day.
It stands about ten inches tall.

The donkey is made from 100% hand-dyed wool felt and stuffed with wool from sheep I use to raise. 

The donkey that Olivia hand-sewed and
embroidered.  She used beads and sequins
to decorate the purple blanket.

She is so happy with the donkey she made, and now has a new stuffed animal with which she can play.

Now it’s your turn!
What is your Kid-friendly Summer Craft(s)?
We would love for you to share them!

Read Full Post »

Each month, the Unique Women in Business team does a Blog Hop focused on a different theme.  For April, the focus is on celebrating womanhood.

Each woman has many roles in her lifetime.  At some stage in her life, a woman may only have a couple of roles (perhaps a daughter and niece, for example). 

My Niece's Hand
One of my niece’s hand. Her fingers are saying
“I love you”
in American Sign Language (ASL).

At another stage in her life, a woman could have many roles such as: daughter, sister, aunt, niece, cousin, friend, wife or partner, mother, grandmother, worker, volunteer, leader, follower, nurturer, caregiver, peacemaker, teacher, artist, or more. 

Nana and the Girls
My mom with two of her grandchildren:
Sophia and Olivia (my daughters).

Some of these roles are not of one’s choice – they are made by others…while other ones are clearly personal choices. 

Two of the roles that I have chosen are: stay-at-home mother and homeschool educator.  When I was younger, I did not even envision my life as having children in it…much less being a mother who homeschools her two daughters.  Yet, being a mother and homeschool teacher have been two of the most challenging and rewarding roles in my life!

Girls in Awe as Monarch Flies Away
The girls watching a a monarch
that they raised from a caterpillar
fly in front of them. 
This particular monarch stayed around them
for quite a while before flying to the pasture. 
It was such a memorable and amazing moment for us all!

Prior to adopting Sophia in 2000, I was content with running a non-profit organization that I founded that offered art and farm camps to children; a teen mentorship program; and volunteer program for individuals, families, corporate teams, and individuals required to do court-ordered community service.  A good percentage of my year was spent writing proposals and seeking funding to do the camp program; and writing curricula for each of the camp weeks. 

Once Sophia and Olivia were adopted from orphanages in China, and their special needs were diagnosed in the United States (both came with referrals as “healthy” children), life took a very different…and unexpected…turn. 

With Olivia requiring in-home therapy multiple days per week from an occupational therapist, physical therapist, and special education instructor combined with therapy that I needed to do with her multiple times per day, my decision to end my outside-of-the-home career was necessary.

Playing in the Body Sack
Sophia and Olivia playing in the Body Sack I made.
It was designed so that they could go into the tube of fabric
and move, crawl, and stand up
(they were small enough to do that at the time this picture was taken).
It helped both of them with their sensory issues
(sensory integration dysfunction); and
helped them identify where their bodies started and ended
(a proprioceptive issue).

I have learned a tremendous amount over the past 11 years in terms of special needs; health/medical issues; developmental delays; learning disabilities; educational philosophies and methods; and a variety of subjects that I have taught the girls….just to name a few areas of growth.

Womanhood, though, isn’t limited to child rearing. While this is certainly an important role and is central to many women’s lives, there is so much more that we (as women) are called to do.

One of the things that I believe celebrates being a woman (and that I try to make a central focus of my life) is is of helping and serving others – whether people are struggling financially, emotionally, or physically.  Women can help individuals outside their family or they can choose to focus on providing support and care for their own family or aging parents.

Looking at the Sensory and Memory Quilt
My dad looking at the sensory and memory quilt
that I made for him (he has Alzheimer’s Disease). 
I gave him the quilt for Christmas 2009.

As the Washington Post reported in its June 16, 2009 issue, “Assistance for frail elders comes, the majority of the time, from a single individual. More specifically, from a woman: Seven of every 10 adult children who help frail parents are daughters.”

Another way in which women can celebrate their gifts is by working with their hands and sharing their creativity with others.  I believe that creativity can inspire, encourage, and even provide comfort to others. With only one lifetime given to us, it’s important to use our time wisely to make things that are wholesome, beautiful, nourishing, and inspiring. 

Mary Mom Me Sophia Olivia
From left to right:  My sister, my mom, me,
Sophia, and Olivia on my mom’s 80th birthday (April 24, 2010).
I made the quilt she’s holding. 
It has the handprints of each family member on white squares. 
On the blue squares, I hand-embroidered words that
were qualities her family used to describe her.

As Anne Frank said, “How wonderful it is that nobody need wait a single moment before starting to improve the world.” It’s worth taking some time to think about how you can make a difference with your gifts and skills.

The poem, Beauty of a Woman, was written by the late eduactor-humorist Sam Levinson for his grandchild and read by Audrey Hepburn on Christmas Eve, 1992.  I think it is a wonderful poem that celebrates womanhood:

For attractive lips,
speak words of kindness.
For lovely eyes,
seek out the good in people.
For a slim figure,
share your food with the hungry.
For beautiful hair,
let a child run his or her fingers through it once a day.
For poise,
walk with the knowledge that you never walk alone.

People, even more than things,
have to be restored, renewed, revived, reclaimed, and redeemed;
never throw out anyone.

Remember, if you ever need a helping hand,

you’ll find one at the end of each of your arms.

As you grow older, you will discover that you have two hands,

one for helping yourself, the other for helping others.

The beauty of a woman is not in

the clothes she wears,
the figure she carries,
or the way she combs her hair.

The beauty of a woman
must be seen from her eyes,
because that is the doorway to her heart,
the place where love resides.

The beauty of a woman
is not in a facial mole,
but true beauty in a woman
is reflected in her soul.

It is the caring that she lovingly gives,
the beauty of a woman
with passing years—only grows.

Harvest Moon by Hand celebrates womanhood with the following products:

Set of three fabric bags that can hold gifts for a special woman in your life.
A peaceful image of a swan to hang in your window
made from hand-poured beeswax.
A set of upcycled notecards made from wallpaper samples.
Wonderful for sending a beautiful greeting or thank you letter to
a woman who has made a difference in your life.
A hand-embroidered needlebook made with all-natural wool felt.
If you sew and share your skills with others,
a needlebook is a good way to keep your needles and pins handy.
A four-color window star to beautify one’s home.
Window stars are lovely gifts for birthdays and Mother’s Day.
The UWIB team has many inspiring and creative women who are participating in this month’s Blog Hop.  Please take some time to visit these women and see how they are celebrating womanhood:

Audrey Fetterhoff http://audreygardenlady.blogspot.com/
Linda Stranger http://capecodjewel.blogspot.com/
Judy Woodley http://wellspringcreations.blogspot.com/
Janet Bocciardi http://www.honeyfromthebee.com/
Ann Rinkenberger http://harvestmoonbyhand.blogspot.com/ (you are here right now)
Celeste Bocchicchio-Chaudhri http://elephunkstrunk.blogspot.com/
Wendy Kelly http://blog.vintageday.com/
Cory Trusty http://aquarianbath.blogspot.com/
Karen Terry http://jmjcreations.blogspot.com/

Read Full Post »

Easter was on Sunday, April 24th.  The girls did some activities at home before Easter to celebrate the holiday.  One of the things they look forward to doing each year is coloring eggs. 
Olivia’s hard-boiled eggs sitting in cups of dye.
Sophia and Olivia each dyed six eggs.

The girls also made Resurrection Buns.  They each had eight triangles of crescent roll dough.  They rolled a marshmallow in dairy-free butter and then in sugar/cinnamon mix.  Next, they wrapped the dough around the marshmallow and made sure there were no holes.  They baked them and when they came out of the oven, the marshmallow had melted leaving a gooey mess of melted marshmallow, butter, cinnamon, and sugar. 

The Resurrection Buns have no nutritional value and are very unhealthy.  Yet, they tie in with the Easter story…that’s the justification for making and enjoying them!

Sophia making her batch of Resurrection buns.

A new thing we made this year were Italian Easter Egg Baskets.  They are called Pupa Cu L’ova and basically they are dough wrapped around a dyed, hard-boiled egg.

Olivia with the baked (but undecorated) Pupa Cu L’ova.

After the dough-basket is cool, it is frosted and decorated with sprinkles.

The idea came from a recent issue of Living Crafts magazine.  They didn’t have a name for it in the magazine, only an explanation that the magazine editor’s daughter received one of these pastries from her teacher at her Waldorf school. 

Sophia’s and Olivia’s Italian Easter Egg Baskets.
They want to do them again next year.

For breakfast, one of the recipes I tried this year was from a past issue of Family Fun magazine.  Basically, it is making scrambled eggs and putting them in hash-brown baskets/nests that were baked in the oven. 

After breakfast, the girls sang in the children’s choir.  They both did a nice job singing.

We went over my parents’ home to have Easter dinner and to celebrate my mom’s 81st birthday which falls directly on Easter this year.  In her 81 years, she said that this was the first time that Easter was ever on her birthday.  “It’s been on the 23rd, but never on the 24th,” she said.

Olivia holding the Easter lamb cake that she helped make and decorate.
For many years now, she has wanted to help make this cake.

Having Easter lunch at my mom and dad’s home.
We all brought food so that my mom
didn’t have to do any cooking.

We enjoyed dessert, the children played outside on the deck, and then headed down to the dock to play in the lake.  They played games outside and had fun spending time together.

Inside, my mom opened birthday gifts and she handed out Easter baskets that she made for each of the children. 

My mom opening a present from my dad.
My dad wasn’t able to get a card and gifts this year
since he no longer can drive (due to Alzheimer’s Disease).
So my sister and I got some gifts for him to give to my mom. 
Needless to say, she was very surprised and teary as she opened each gift.

Read Full Post »

The girls look forward to St. Patrick’s Day each year because we do a variety of activities to celebrate the holiday.  Perhaps their favorite activity is building a leprechaun trap.  For about five years now, they’ve been building traps. 
In 2009 and 2010, they used the same trap, making minor modifications in the pathway leading to the trap; the food and beverage that they left on the tiny tea set; and the extra items they put around the trap (e.g., little trees, wooden horse and cart).
This year, they chose to build a different trap.  The one “rule” I have is that they have to use materials and items that we already have on hand.  In other words, they need to be resourceful in creating their trap. 
The girls building the trap and arranging different items
leading to the trap.

After they finished putting the trap together, they explained how it worked.  They hoped the coins would entice the leprechaun into jumping on the box, walking up the ladder, over the platform, across the table (also lined with coins), and then hop onto the trap where jewelry and coins were strategically placed on top of a flap that would collapse under his weight.

The girls by their leprechaun trap.
The next morning, the leprechaun did visit.  He did not repair their girls’ shoes like they had hoped.  (Leprechauns are cobblers who work on fairy shoes.  They only make one shoe…for some reason.)  Instead, he sprinkled gold dust all over the table, had pushed over the box that he was trapped in for some time, and left four gold $1 coins (two for each of the girls). 
After the leprechaun visited.
Later in the day, we read a few books:
Leprechauns and Irish Folklore by Mary Pope Osborne
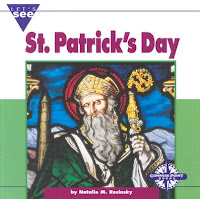
St. Patrick’s Day by Natalie Rosinsky
Finn McCoul by Brian Gleeson
Clever Tom and the Leprechaun by Linda Shute
This last book – Clever Tom and the Leprechaun is one of the books that is used to make the monthly paper quilts that the girls are making.  The patterns are in Easy Literature-Based Quilts Around the Year.  They’ll be making the quilt based on this book by the end of the month. 
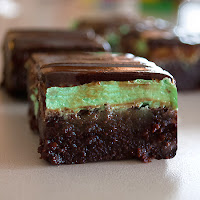
Normally, I try to make a variety of Irish food (e.g., Irish soda bread for breakfast) at different meals on St. Patrick’s Day.  This year, the only special “green” food that I made was a triple-layer brownie.  The bottom layer is the brownie (homemade…not from a box), the middle layer is a powdered sugar frosting that is mint flavored and tinted green, and the top layer is a chocolate chip frosting. 
The recipe is from Taste of Home magazine and is absolutely amazing!  The brownies are the type you don’t want to stop eating…they’re that good.  So, I cut the brownies into very small pieces so when the girls ask, “How many brownies can we have?” I can say, “You may have two brownies.”  Little do they know that two brownies is still smaller than one full-size brownie. 
Chocolate Mint Brownies – The recipe I followed
looked just like this when it was done. 

One of highlights of the St. Patrick’s Day holiday was being featured on Good Morning America’s Parenting section on its website.  The article is called “Leprechaun Traps, Shamrock Hats and More: St. Patrick’s Day Crafts for Kids – Fun Activities That Teach Children About the Luckiest Holiday of All” and it is written by Christina Caron.

Christina found out about me through a mention and interview on two other websites.  She called me to ask more about what I’ve done with the girls in the past, and wanted to get more information about leprechaun traps.  We had a nice half-hour conversation and she wrote a great feature about different ways to celebrate the St. Patrick Holiday with children.  Here’s where to read the article:  http://abcnews.go.com/US/Parenting/st-patricks-day-crafts-kids/story?id=13152467&page=1

Shibley Smiles

Read Full Post »

Older Posts »