Feeds:
Posts
Comments

Archive for the ‘charlotte mason’ Category

Since June, Mama to 4 Blessings along with Harvest Moon By Hand, Adventures of Mommydom, Sweet Diva, and Sweet Phenomena have hosted weekly Fun in the Summer Fun link up events.
With homeschooling planning being finalized or already begun, the hosts are wrapping up the Fun in the Summer Sun event this week.
*~*~*~*~*~*~*~*~*
I’ve been working quite a bit on finishing the homeschool schedule for the 2011-2012 school year. Donna Young has some great forms for a DIY homeschool planner. I used the 6-column/9-row format. For each week, I need two of these forms in order to accomodate the school subjects and activities the girls are doing.
Here’s what a sample week looks like (the second page is under the first one, but the subjects are showing for each page):
A page from my 2011-2012 homeschool planner.
(The form is from Donna Young’s website.)
The subjects include:
– math,
– reading (Newberry and Caldecott books),
– writing (e.g., fiction, non-fiction, creative, poetry),
– spelling,
– U.S. geography (multi-disciplinary unit study),
– nature study,
– science,
– home economics (sewing, cooking, and handiwork),
– character education,
– penmanship (printing, handwriting, and Spencerian),
– 5 in a Row (literature-based unit study),
– art,
– music (piano, harp, music fundamentals, and bookwork),
– American Sign Language,
– holidays (using the Happy Birthday, Grandma Moses book for ideas),
– computers (apps on iPad for multi-sensory learning to help Olivia with reading and spelling due to multiple learning disabilities; and for Sophia to help augment her core subjects)
– typing/keyboard/word processing/Office software programs
– history (American – from Civil War to the present day)
– physical education
– special education and speech therapy
– Brownies and Girl Scouts (doing the Juliette program)
– 4-H
*~*~*~*~*~*~*~*~*
So, with planning almost done (a huge relief!) and summer wrapping up, this marks the end of what has been a great partnership between five mothers who blog. It’s been a delight and privilege to be a part of the Fun in the Summer Sun series.
To stay in touch, we’re doing a link up this week instead of a regular topic. So, simply link up your blog, Twitter, Facebook, RSS Feed, or any other social media to which you belong. Please do not link up giveaways (they will be deleted).
Hope you had a great summer! Thank you for participating!

Read Full Post »

This week, as part of our nature study, we focused on bats. We’re using the Handbook of Nature Study website which features different Outdoor Hour Challenges based on the book with the same name.  I used two different challenges on the website: Outdoor Hour Challenge #49 Bats and Outdoor Hour Challenge Summer Series #4 – Bats and the Sense of Hearing since each has different activities.

Throughout this post, three different typefaces are used:
– Bold – are words from the Handbook of Nature Study website.
– Italics – are words from the book titled Handbook of Nature Study by Anna Botsford Comstock.
– Regular – are my own words.

1. Read pages 241-245 in the Handbook of Nature Study. Although the lesson for bats states that it should not be given unless you can directly observe bats in person, I think this interesting creature deserves his own Outdoor Hour Challenge.

These are some points that were made in the book that I shared with the girls:

[The] wing [is a] thin membrane…equipped with sensitive nerves which inform the flier of the objects in his path, so that he darts among the branches of trees at terrific speed and never touches a twig.

Bat wings have raised domes which act as touch receptors.

The flight of the bat consists of darting hither and thither with incredible swiftness, and making sharp turns with no apparent effort.

[Bats]…catch insects on the wing for food. He makes a collecting net of the wing membrane stretched between the hind legs and tail, doubling it up like an apron on the unfortunate insects, and then reaching down and gobbling them up; and thus he is always doing good service to us on summer evenings by swallowing a multitude of insects.

The short fur of the bat is as soft as silk, and covers the body but not the wings.

The plan of the wing is something like that of the duck’s foot; it consists of a web stretched between very much elongated fingers.

If a boy’s fingers were as long in proportion as a bat’s, they would measure four feet.

Since fingers make the framework, it is the thumb that projects from the front angle of the wing, in the form of a very serviceable hook.

\
Bat wing bone structure.

These hooks the bat uses in many ways. He drags himself along the floor…or he scratches the back of his head with them.

He is essentially a creature of the air and is not at all fitted for walking; his knees bend backward in an opposite direction from ours. This renders him unable to walk, and when attempting to do so, he has the appearance of “scrabbling” along on his feet and elbows

Bat walking using its wings/elbows to help move it along.

He uses his teeth to aid in climbing.

The little brown bat’s wings often meausre nine inches from tip to tip.

Brown bat flying with wings outstretched.

He does not fold [his wings] like a fan, but rather, like a pocket knife.

The tiny foot…is armed with five wirelike toes, tipped with sharp hooked claws. It is by these claws that he hangs when resting during the day, for he is upside-down in his sleeping habits, slumbering during the daytime.

The bat is very particualr about his personal cleanliness. 

He washes his face with the front part of his wing, and then licks his washcloth clean; he scratches the back of his head with his hind food and then licks the foot.  [To] clean his wings, he seizes the edges in his mouth and stretches and licks the membrane.

The bat has a voice which sounds like squeak of a toy wheelbarrow, and yet it is expressive of emotions.

He squeaks in one tone when holding conversation with other bats, and squeaks quite differently when seized by the enemy.

Little brown bat.

The mother bat…takes [her babies] with her when she goes out for insects in the evenings; they cling to her neck during these exciting rides; but when she wishes to work unencumbered, she hangs her tiny youngsters on some twig and goes back for them later.

The little ones are born in July and usually occur as twins.

During the winter, some bats hibernate like woodchucks or chipmunks. They select for winter quarters some hollow tree or cave. They do not awake until the insects are flying. Others migrate to the south with the advent of cold weather.

Hibernating bats.

2. Supplemental reading in The Burgess Animal Book for Children: Read Story 21. Use the illustration on page 128 to prompt a narration after reading the story about the Little Brown Bat.

The girls both enjoyed the story. There was one section about where bats will rest, and barns were mentioned. This, of course, made them think about how fun it would be to take flashlights and go the hayloft in the barn and see if they could spot any bats.

“Should we go at night? Like around 10 p.m.?” Olivia asked.

“No, they’d be outside eating bugs,” said Sophia. “Let’s go up during the day when they’d be hanging there.”

We went to the barn loft and I gave each of the girls a flashlight. They were so eager to shine their flashlights on the inside of the barn roof and find bats. 

Climbing on top of some old hay bales to find bats.

They walked the entire loft and then Olivia suggested they climb on top of some hay bales. Although they wanted to see bats, I couldn’t even begin to imagine what would happen if bats flew out from behind the wood pieces in front of them.

Looking for bats in the barn loft.

Since we didn’t see any bats in the barn, we headed to the pine trees in the front yard since I’ve seen bats flying around the trees at night. Again, we didn’t see any bats from the ground.

The girls even climbed one of the tallest pine trees to see if they could spot any bats.

Sophia enjoys climbing trees.
She said the pine tree had a lot of sap where she was standing.
She even spotted raccoon scat on one of the limbs.

If there are any bats in the front yard pine trees, they must be up near the top of them.

Olivia was determined to find at least one bat.

3. This week during your 10-15 minutes of outdoor time, look for any mammals in your neighborhood or in a near-by park. Many of us will not find any mammals to observe or signs of mammals like scat or tracks. This should not discourage us from taking the time to be outdoors with our children.

When the girls were climbing the front pine tree, Sophia spotted some raccoon scat. Near the base of the tree, there were parts of pine cones that the raccoon (s) didn’t want to eat.

Parts of pinecones that the raccoon didn’t want to eat.

Both of the girls were excited to have spotted evidence that there are other wild animals here that we don’t see during the day.

4. After your walk, discuss any interesting things that you observed. Help your child to find words for their experience. Record their words on paper and have them sketch a simple drawing for their nature journal.

Use some of the ideas that worked in the past like a rubbing of a leaf or feather. Take photos for your nature journals. Research and record what you learned about the bat this week from reading in the Handbook of Nature Study. One idea would be to sketch and record how a bat’s wings are different from a bird’s wings.

You could discuss why a bat is considered a mammal and how it differs from other mammals that we have studied. Keep it simple but make some connections this week.

The girls will be working on their nature journals and doing an entry about bats now that they saw the bats flying at night (see more information below).

*~*~*~*~*~*~*~*~*~*

Summer Series #4
Bats and Sense of Hearing – Train Your Senses

Sight: Observe the sky at sundown, look for the silhouettes of birds, bats, or insects in the air.

Hearing: Observe the sounds of the night starting at sundown: bats, crickets, frogs, bark of a dog, hoot of an owl, birds, rustling in the leaves, wind, etc. Can you hear more sounds on a damp night? Can you hear more sounds at night when your sense of sight is not as keen?

Inside Preparation Work – The reading from the Handbook of Nature Study is the same as above. There was another book reference “Discover Nature at Sundown,” but I didn’t have this book.

Outdoor Hour Time:

1. Things That Go Bump in the Night: Spend 15 minutes outdoors at sundown, observing some of the sounds suggested in the book. The book suggests observing sounds on a damp night and a dry night and comparing your results. Something else to listen for is “sudden silence” where the night noises completely stop and then start up again after a period of time.

Since we didn’t spot any bats during the day, we agreed that we would go out again when it was starting to get dark. So, around 8:45 p.m., we walked to the front yard.

The girls both heard frogs in the pond and pasture and birds in the trees. They said they felt a few rain drops and the wind.

We looked at the pine trees and walked up and down the driveway where the bats are often seen, but there wasn’t a single bat out at that time. I suggested that we come out again when it’s a bit darker…in about 15 minutes.

So, around 9:00 p.m. we went out again when it was much darker. It took a moment for our eyes to adjust from being in the light indoors to the dark outdoors. Yet, we could easily see everything outside after a few minutes. 

Again, Sophia and Olivia heard frogs calling to one another, but the birds had now quieted down. A new sound was apparent: mosquitos buzzing around our ears. 

Then…the first sighting!  “Bats!” the yelled enthusiastically and pointed up. 

Sure enough, the bats were flying within 3-4 feet of our heads. It was a great opportunity to see the bats up close and in flight.

Olivia and Sophia looking at the pine trees
where the bats were flying to and from around 9:00 p.m.

We walked to the pine trees again and saw that they were heading in and out of one of the trees more so than the others. Olivia began counting the number of bats she saw and got to 14.

As we walked back to the house, I saw a firefly near the pasture gate. We walked over to where I saw it, and then the golden glow happened again, but closer to the girls this time.  Needless to say, they were thrilled!  They had never seen a firefly up close.

Firefly.

The more we looked, the more fireflies we saw around us. It was a wonderful time outside – seeing both bats and fireflies!

2. World of Bats:


“Although an occasional bat can be found flying about during the day, most bats take to the sky during the twilight hours. On a summer evening you can observe them in a dance of twists, spirals, and loops that is choreographed by the insects they pursue.” Discover Nature at Sundown, page 148

If you have the opportunity to observe some bats up close, make sure to use some of the suggestions from the Handbook of Nature Study and/or the Discover Nature at Sundown.

The girls were able to see quite a few bats fly and the variety within the flight pattern. Both were amazed at how quickly they flew.

Although some bats did fly relatively low (about 8-9 feet from the ground), the majority flew much higher (about 20-40 feet high).
Follow-Up Activity:

Make sure to give time and the opportunity for a nature journal entry.

Sophia and Olivia will work on their nature journal entry in the morning and recall their experience of seeing the bats flying around them.

Read Full Post »

In the spring, we did a nature study about cattails.  It was the first of four studies that we will be doing over a course of the year.  This idea came from the Handbook of Nature Study website, and is the
Outdoor Hour Challenge Summer #7 – Summer Cattail Observations.
.
Throughout this post, three different typefaces are used:
– Bold – are words from the Handbook of Nature Study website.
– Italics – are words from the book titled Handbook of Nature Study by Anna Botsford Comstock.
– Regular – are my own words.

Inside Preparation Work:


Read pages 500-502 in the Handbook of Nature Study if you have not done so before (starting on page 551 if you have the free download version) . It might also be beneficial to read it again this season and highlight the parts that contain information about the leaves of the cattail plant.

The following parts of the book were shared with Sophia and Olivia:

In June and early July…it will be seen to have the upper half of the cat’s tail much narrower and different than the lower half – as if it were covered with a quite different fur.

Cattail balloon and the part above it
(this is where the pollen comes from).

It seems to be clothed with a fine drooping fringe of olive yellow.

The fringe is a mass of crowded anthers, two or three of them being attached to the same stalk by a short filament.

These anthers are packed full of pollen.

All the leaves have the same general shape, but vary in length.

Olivia and Sophia by a group of cattails.
Olivia is swatting off mosquitos and
is ready to do something different.

Each leaf consists of two parts: the free portion, which is long and narrow and flat towards its tapering tip but is bent into a trough as it nears the plant; and the lower portion, which clasps the plant entirely or partially, depending upon whether it is an outer or inner leaf.

The texture of the leaf is soft and smooth. 

The cattail is adopted for living in swamps where the soil is wet but not under water all the time.

The cattail roots are fine and fibrous.

Outdoor Hour Time:


Enjoy your outdoor time this week at your cattail spot. If you have been participating in the year-long cattail study since last autumn, you will know just where to look for cattails. Use the suggestions from the Handbook of Nature Study to talk a little about the habitat where your cattails are growing.

Is your cattail still growing in water or has it dried up?

The cattails are both growing in and out of the pond.

The cattails grow in and out of the pond.

What does the “cattail” parts of the plant look like now?

Sophia said that the cattail part is, “Brown, fluffy, and tough.”

“There’s some kind of stem at the top,” Olivia said.

I asked the girls to remove one of the cattails so that they could observe it closer inside. Olivia tried to snap off the cattail, but the stem was very tough to remove. Sophia tried, struggled a bit, and finally was able to break it off.

The girls were trying to break off the top of a cattail
so they could examine it indoors.

What color and shape are the leaves?

Olivia said, “Long and green.”  Sophia said, “Long, pointy at the end, silky, smooth, and green.”

Do you see the cattails seeds or balloons?

The balloons are the parts that we see now. (We had to look up what a cattail balloon is on the internet and found that it is the term for the long, oval brown part of the cattail.)
Can you pull some of the fuzz from the cattail and observe it more closely?

We took one cattail as well as a small section that was on another stalk.  We brought these two items inside to look at them closer with a magnifying glass. Some of the plant is included in the nature journal page.
How do you think the seeds spread, by wind or water?

The girls both thought they would be spread by the wind.

However, as we discussed it more, we thought the seeds could be spread by both wind and water – the wind could carry the seeds to different nearby areas of the pond and pasture; and the water could carry the seeds (once they landed on the water) to different parts of the pond itself.
How crowded are the cattails growing together?

Some of the cattails grow close together in the pond while other cattails are growing by themselves in different parts of the pond. and pasture.

The pond where the cattails are growing.

Train Your Senses


Sight: Observe the cattail’s habitat. Look for birds, insects, and animals living or resting in or on the cattails. Look for nests. See if you can find the cattail flowers.

The girls saw red-winged blackbirds, two unidentified birds, many dragonflies, and mosquitos. The dragonflies were twelve-spotted skimmers. We were seeing the brown and white winged ones – the males. We didn’t see any females.

Twelve-spotted skimmer dragonfly.

Smell: Sit or squat near your cattails and close your eyes. Breathe deeply and see if you smell anything.

We didn’t sit near the cattails because most of them were near or in the pond. There seemed to be a lot of mosquitos and other insects near the edge of the pond.

Olivia was having a particularly difficult time with all the bugs, so I opted to move on to walking in the wooded area of the pasture and see if we could spot anything else of interest.

Touch: Feel the leaves, edges, and spikes of the cattails.

Both of the girls felt the leaves and thought they were soft and silky. Despite the softness, they are quite tough and provide a bit of challenge when trying to break a small section off.

Hearing: Take a minute to listen as you stand or sit near your cattails. Can you hear any birds or insects? Water running?

The red-winged blackbirds were the predominant sound…that and the buzzing of mosquitos.  The water is in a pond, so there isn’t much movement on a relatively calm day.

Follow-Up Activity:

Make sure to allow some time after your outdoor hour to discuss any subjects that your child finds interesting. Encourage the completion of a nature journal entry recording your observation of your cattails. You may wish to pull out your other cattail entries and compare the year-long changes in your cattails.

Once we were inside, we spent time touching and looking at the cattail balloon and leaves. From a sensory aspect, the cattail has such a diversity of textures which makes it an interesting plant to explore.

Read Full Post »

I was looking at the Handbook of Nature Study website, and came across One Small Square – Outdoor Hour Challenge #9.

Throughout this post, three different typefaces are used:
– Bold – are words from the Handbook of Nature Study website.
– Italics – are words from the book titled Handbook of Nature Study by Anna Botsford Comstock.
– Regular – are my own words.

“Children should be encouraged to quietly and
patiently watch the bee, spider, ant, caterpillar or
other wildlife that crosses their path.
If this seems dull to them,
they just need to watch more closely,
because their alert eyes can catch the smallest ways of insects
in ways that grown-ups can’t without magnifiers.”
~ Charlotte Mason, volume 1, Outdoor Life, page 57 ~

1. Let’s give ourselves a challenge. Gather yarn, scissors, ruler, and four rocks. (Optional: small garden trowel and magnifying lens.)


Measure off one square somewhere out in your yard or near-by park. (I prefer to do this somewhere I can dig up a few inches of soil and not get into trouble.) Use your ruler to place rocks in a one foot square plot. Use the yarn to mark off the edges of your square.

Now the challenge comes in. See how many different things you can find in your square. If there are leaves, lift them up and see what is underneath. If there are rocks or gravel, scrape them aside and see what is underneath.

If there is grass or weeds and you have permission, use your trowel to dig up a few inches under the grass, moving it carefully to the side to replace when you are done observing. Use your hand lens if you have one along with you on your challenge.

I remember reading about this activity when I did a summer camp program for children and thought it was such a wonderful way to closely explore a small section of the world.

By having such a tiny section in which to explore, one is essentially “forced” to take her time to look carefully and go section-by-section and find new things.

Olivia discovering a world within the square of yarn. 

Olivia found some things right away within her square: a small stick, odd-shaped leaves, grass, and moss.

Sophia identifying what she sees first
without a magnifying glass.
After a little while, Olivia felt she had identified everything in the square. I joined her and we were able to find some more items that she had missed on her first time around the square.
Looking a bit closer,
Olivia found even more items.

Olivia used her magnifying glass to find a few more items: part of a pinecone, ferns, creeping Charlie, some kind of clover, dandelion leaf, dew, and a pine needle.
Sophia seemed to have found an interesting section of the front yard. Right away she said she saw: grass, pinecone shaving, wood, creeping Charlie, old pine needles, a bit of dirt, moss, dew, and a few little ferns.
Sophia exploring another section of the square.
By alternating with her magnifying glass and getting closer to the ground, Sophia found even more items in the 1 square foot of space: seed pod, few pieces of bark, a weird-shaped leaf that looks like a heart, a few roots, old grass that’s turning brown, a dandelion leaf, wet ground, and tiny little bugs.
That’s quite a diversity of natural items within such a small amount of space. Imagine what is in twice that amount of land…or the entire farm. 
It’s so easy to rush through each day without taking the time to slow down and appreciate the small things in life. If we hadn’t done this Outdoor Hour Challenge, we would not have enjoyed seeing two miniature worlds right in the front yard. 
Although each one was similiar to the other in some respects (e.g., both had grass, moss, and dew), there were unique elements in each square which made it all the more fascinating to further explore and take one’s time in finding as many different things as possible.
2. Add any new items to your focus list that you are keeping in your nature journal. Add any items to your collection that you found during this week’s challenge time. Give an opportunity for a nature journal entry. If you used your hand lens during this week’s challenge, encourage your child to draw something they saw that you would not normally see like a small insect, worm, or seed.

The girls each chose a few small items that can be pressed and placed into their nature journals. Once the items are pressed, they will write and illustrate the entry for the day. 

Because I wrote the list of items they found as they were saying them, they can simply copy their lists at a later date.

Read Full Post »

I was looking at the Handbook of Nature Study website, and came across Outdoor Hour Challenge #10 –
Picnic.

Throughout this post, three different typefaces are used:
– Bold – are words from the Handbook of Nature Study website.
– Italics – are words from the book titled Handbook of Nature Study by Anna Botsford Comstock.
– Regular – are my own words.

The website said, “Picnics don’t need to be fancy. Wrap up a sandwich in a cloth napkin, grab a piece of fruit, and some water and you are set. Venture outside even if it is only to your own yard to sit on a blanket and enjoy your lunch. Afterwards you can make time for a short period of nature study.”

So, that’s what we did today…on my 45th birthday. 

1. The challenge is to have a picnic. No need to go far or to even have a picnic table. Food always tastes better outside and if you don’t want to commit to a whole lunch, why not just a snack?

“…When the weather is warm, why not eat breakfast and lunch outside?
…Besides the benefit of an added hour or two of fresh air,
meals eaten outside are often delightful, and
there’s nothing like happiness to convert food and drink
into healthy blood and bodies.”
~~ Charlotte Mason, Outdoor Life, page 43

We ended up having a light dinner and dessert outside on the little deck.  The girls brought out pillows and blankets to sit on. 

Olivia and Sophia having dinner on the deck.

After dinner, we enjoyed French silk pie.  Sophia wanted to put candles on the pie.  They were lit in the home and mudroom, but slowly went out one by one by the time the pie got to me.  “You can still make a wish, and pretend to blow out the candles!”

Sophia bringing out the French silk pie.

Pretending to blow out the candles I said, “Oh, wow!  Look at that!  I got them all out! The best I’ve ever done!”
After you eat, sit and listen to the sounds of nature.

“Given the power of nature to calm and soothe us in our hurried lives,
it also would be interesting to study how a family’s connection to nature
influences the general quality of family relationships.
Speaking from personal experience,
my own family’s relationships have been nourished over the years
through shared experiences in nature-
from sharing our toddler’s wonder upon turning over a rock and
discovering a magnificent bug the size of a mouse,
to paddling our old canoe down a nearby creek
during the children’s school years,
to hiking the mountains.”
~~Richard Louv, Last Child in the Woods
We listened to nature before we ate and at times while we were eating.  The birds were singing (especially the wrens who have a nest near the deck), the swallows were flying around the backyard and then under the eaves of the barn, and the wind was blowing lightly.  It was a beautiful night to have a picnic.

The pine tree next to the deck and back of the house.
It is now taller than the house.

We spent some time looking at the vegetable/herb garden, flower garden, strawberries, and clover – all of which are subjects of other nature studies that we have done/are in the process of doing during the upcoming day or so.

The first tiger lily of the season bloomed on the 29th of June…my birthday.

2. After your picnic, spend 10-15 minutes observing your surroundings. Add anything new to your list of items observed in your focus area that you are keeping in your nature journal. Make note of any additional research that needs to be done for things your child is interested in. Make a journal entry if you wish.

We didn’t spend time after the picnic outside because the mosquitos were getting progressively worse.  The girls get rather significant reactions to mosquito bites, so it was better to go inside at that point.

The girls are interested in the tiny toads that they have been finding.  At 1/4″ long, they are very small; in fact, the smallest we’ve ever seen here.

Read Full Post »

On 5 Kids and a Dog, there’s a series called the ABCs of Homeschooling.  This week’s letter is “I.” 

Alphabet ATC or ACEO Available - Needlefelted Letter I ….is for Investigation. 
When I think of homeschooling, a lot of what the girls and I do relates to investigation.  Every day there are many ways to learn through investigation.  Below are some pictures of how the girls learn by investigating.
Investigating the Environment
Girls Playing in the Pond
Sophia and Olivia exploring the pond.
The  girls enjoy exploring the pond, pastures, and nature trail on an almost daily basis.  Seeing a variety of birds, toads, and frogs – sometimes ones we’ve never seen before – leads us to identification guides to help us figure out what we’ve seen. 
We use the Handbook of Nature Study (both the book as well as the blog that offers Outdoor Hour Challenges) which has been a highlight of learning about the environment.
Investigating New Ideas through Reading
Nice and Comfortable Doing Homeschooling
Reading outdoors in the early fall.
A key part of homeschooling is reading, and the main curriculum that I use (Sonlight) offers a wealth of high quality, “living” books that cover history, geography, literature/reading, and science.  We make at least one trip to the library per week, sometimes as often as two or three times, to check out new books as well as books on CD. 
Reading aloud, listening to audio books, and reading independently happens on a daily basis.
Investigating Wildlife and Anatomy

Sophia Exploring a Jaw with Teeth
Sophia examining parts of a skull
using a disposable fork and ruler
(having more “scientific” equipment would be nice).
Living in the country provides many opportunities to discover living wildlife – eagles, hawks, foxes, minks, deer, pheasants, and owls.  By traveling to different parts of the state and country, we also have seen birds and wildlife that we normally would not see here which is exciting.
We also have seen plenty of wildlife that no longer is living.  Going on walks with the dogs has provided close-up views with some animals that walked too close to the road. 
Sometimes, after winter, an animal’s bones remain in the ditch.  Although this is kind of gross, I have used plastic bags to pick up the bones and lots of bleach to clean them.  In that way, the girls have been able to learn about the anatomy of different animals (like a coyote, for example) – something they would, at best, only be able to read about if they didn’t live where they do.
Investigating the World Through Geography Lessons and Travel

Olivia Balancing on a Rock
Olivia balancing on a rock in
Grand Marais, Minnesota.
A major part of homeschooling is learning about the world.  We are wrapping up a multi-year ABC journey around the world where the girls learned about a different country for each letter of the alphabet (with the exception of “X” since there is no country that begins with that letter).  Starting this fall, we will be starting with a multi-year study about each of the 50 states which we’re very excited to do! 
Traveling – within the state, throughout the country, and to foreign countries – plays an important part in homeschooling.  Learning about different cultures and ways of life; different types of land; and food all help the girls appreciate the world they live in.
Investigating Math and its Connection to the Natural World
Measuring a Worm
Sophia measuring the length of a worm.
Learning math facts is one thing…but when the girls can apply math skills that they’ve learned to real life, the facts and skills make even more sense.  The girls enjoy measuring things – for example, how long something is (like the worm shown above), the distance between an animal’s tracks, or how deep a woodpecker’s hole in the tree is (see the photo below). 
Measuring Depth of Woodpecker Hole
Sophia measuring the depth of a hole
made by a woodpecker.

Investigating Science and How Things Work

Learning about Switches
Learning about electricity and circuits;
and getting a lightbulb to work.
Both the girls enjoy science and doing experiments.  When I was in elementary school, I don’t remember doing many science experiments.  In junior high, I recall dissection lessons (worm and frog) and using bunsen burners.  In senior high, there were limited experiments as well. 
It’s too bad because the highlights for science for the girls (and me) have been the hands-on experiments we’ve done which have enhanced the lessons and reading materials.  For topics that were a bit more challenging (e.g., electricity), doing the experiments made all the difference for the girls in terms of comprehension and retention.
Investigating History and Cultures

The Girls and a Mummy
Sophia and Olivia taking a look at a mummy
when studying about Egyptian history and culture.
From the start of homeschooling the girls when they were Kindergarten, history has been a fascinating subject for them.  A few years ago, we read the entire American Girl series and Little House series (both which focus on American History).  When we began using the Sonlight curriculum, the girls were introduced to world history. 
Sophia has moved onto learning about American History at a much deeper and broader level than she did when she was younger.  She will continue with American History next year before learning more about ancient cultures and world history.
We covered some of the ancient cultures when the girls were much younger.  Learning about Egypt and the ancient Egyptians was very interesting for us all.
Investigating Music and Creative Expression

Wrench Xylophone
Sophia playing a wrench xylophone
at the Minnesota History Center.
Music has played a central part of homeschooling.  In the early years, music was focused on listening to CDs of various types of music by a variety of artists.  The girls also enjoyed playing child-size percussion instruments at home, and large-scale instruments or unique instruments (like the wrench xylophone pictured above) in public.
Currently, the girls are both taking piano lessons, and Sophia is starting to learn to play the harp.  Olivia wants to play the guitar or the piccolo (though she has to learn how to play the flute first).  In addition to playing instruments, the girls also sing in a children’s choir and perform at least once a month during the school year.
Olivia Making a Handprint Christmas Tree
Olivia painting a tree with a paintbrush
and her handprints.

Creative expression is also done through painting, drawing, coloring, handiwork, pottery, ceramics, and sewing.  Having ways to express oneself through the arts is as critical of a component to homeschooling for us, as is any core subject (e.g., math, reading, science). 

Read Full Post »

This week – during the break between the thunderstorms, heavy rain, and hail plus a tornado less than 10 minutes from here – we were able to do the Outdoor Hour Challenge Spring Series #4: Wildflowers-Dandelions.

Throughout this post, three different typefaces are used:
– Bold – are words from the Handbook of Nature Study website.
– Italics – are words from the book titled Handbook of Nature Study by Anna Botsford Comstock.
– Regular – are my own words.

Before heading outside, I read pages 531-535 in the Handbook of Nature Study about dandelions.  In this way, I could point out different things about dandelions as the girls were looking at them.

Here are some facts from the book that I found interesting:

– The taproot, which lacked only an inch of being a foot in length.  It was smooth, whitish, and fleshy, and, when cut, bled a milky juice; it was as strong from the endpull as a whipcord; it also had a bunch of rather fine rootlets about an inch below the surface of the soil.

– Dandelion leaves [have] edges [that] are notched in a peculiar way, so that the lobes were, by some one, supposed to look like lions’ teeth in profile; thus the plant was called in France “dents-de-lion” (teeth of the lion), and we have made from this the name dandelion.

Dandelion leaves…or
 as the plant was known in France:
“Dents-de-lion” (teeth of the lion)

– The leaves are bitter, and grazing animals do not like to eat them.

– The hollow stalk…may be made into a trombone [by children].  [This is a good] lesson in the physics of sound, since by varying the length the pitch is varied.

– If the plant is in the lawn, the stem is short….It will blossom and seed within two inches of the ground; but if the plant is in a meadow or in other high grass, the stalk lifts up sometimes two feet or more. 

Dandelion stems can grow to be up to two feet tall.
This one was over one foot tall.

– Before a dandelion head opens, the stem, unless very short, is likely to bend down, but the night before it is to bloom it straightens up; after the blossoms have matured it may again bend over, but straightens up when the seeds are to be cast off.

– It often requires an hour for a dandelion head to open in the morning and it rarely stays open longer than five or six hours; it may require another hour to close.

Unopened dandelion in the morning.
The involucral bracts can easily be seen covering the flowers as well as
near the stem where they make a frill.

– The involucral bracts, in the row set next to the flowers, are sufficiently long to cover the unopened flowers; the bracts near the stem are shorter and curl back, making a frill. 

– In the freshly opened flower-head, the buds at the middle all curve slightly toward the center, each bud showing a blunt, five-lobed tip which looks like the tips of five fingers held tightly together.

Dandelion in the process of opening.

– All the flowers in the dandelion head have banners, but those at the center…have shorter and darker yellow corollas.

Fully-opened dandelion.

– On dark, rainy days and during the night the little green house puts up its shutters around the flower family.

– [Dandelions] awaken long after the sun is up in the morning; they often do not open until eight o’clock.

– After all the florets of a dandelion head have blossomed, they may stay in retirement for several days, and during this period the flowerstalk often grows industriously; and when the shutters of the little green house are again let down, what a different appearance has the dandelion head!  The akenes with their balloons are set so as to make an exquisite, filmy globe.

Dandelion akenes make a silver globe.

– The balloon is attached to the top of the beak as an umbrella frame is attached to the handle, except that the “ribs” are many and fluffy.

Four akenes on my shoe.

– This blossom-bald head after all the akenes are gone…is like a mosaic, with a pit at the center of each figure where the akene was attached.

Dandelion head minus the akenes. 
Notice the mosaic pattern.

– Before the akenes are fully out this soon-to-be-bald head is concave at the center; later it becomes convex, and the mechanism of this movement liberates the akenes which are embedded in it.

Akenes ready to fly off.

– Each freshly opened corolla-tube is full to overflowing with nectar, and much pollen is developed; therefore the dandelion has many kinds of insect visitors.

– The following are the tactics by which the dandelion conquers us and takes possession of our lands:
~~> It blossoms early in the spring and until snow falls, producing seed for a long time
~~> It…fourishes on all sorts of soils.
~~> It thrusts its long taproots down into the soil, and thus gets moisture and food not reached by other plants.
~~> Its leaves spread out from thebase, and crowd and shade many neighboring plants out of existence.
~~> It develops almost numberless akenes, and the wind scatters them far and wide and they thus take possession of new territory.
~~> Many insects visit it, and so it has plenty of pollen carriers to insure strong seeds.

Hand covered in pollen from picking dandelions.

Outdoor Hour Time:

Spend 15 minutes outdoors this week in your own backyard or a near-by park. As you walk along, keep your eyes out for dandelions.

Suggestions for Observations

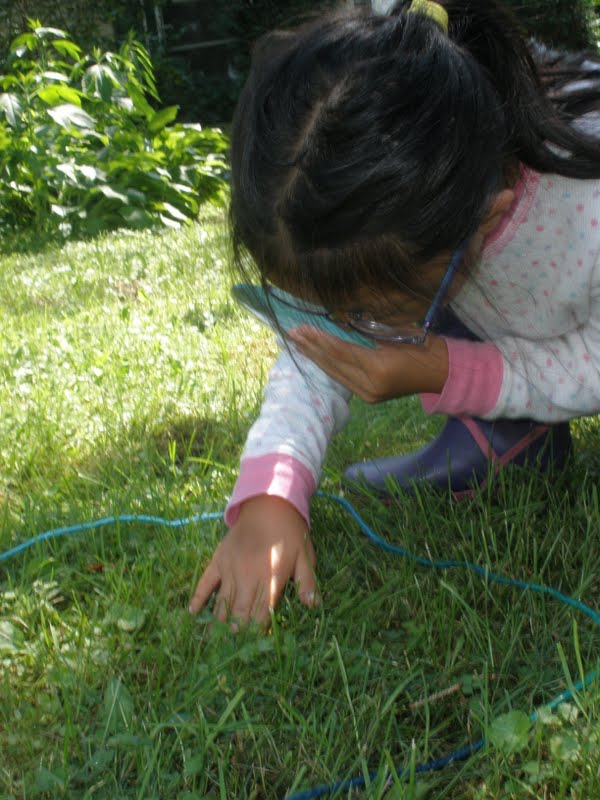
See if you can find several dandelions in various stages of growth.

This was easy to do since we have so many dandelions growing in the yard.  During the mid-day we observed various stages of growth.  In the late-afternoon, we could see the dandelions in various stages of opening-to-closing.

Dandelions in various stages of growth.

Look at the leaves and collect a few for sketching later in your nature journal.

We will be doing an entry in our nature journals this week.

If it is growing in your own yard, you might like to dig up the complete dandelion plant and observe the roots.

Didn’t have a chance to do this, but will do at a later date.

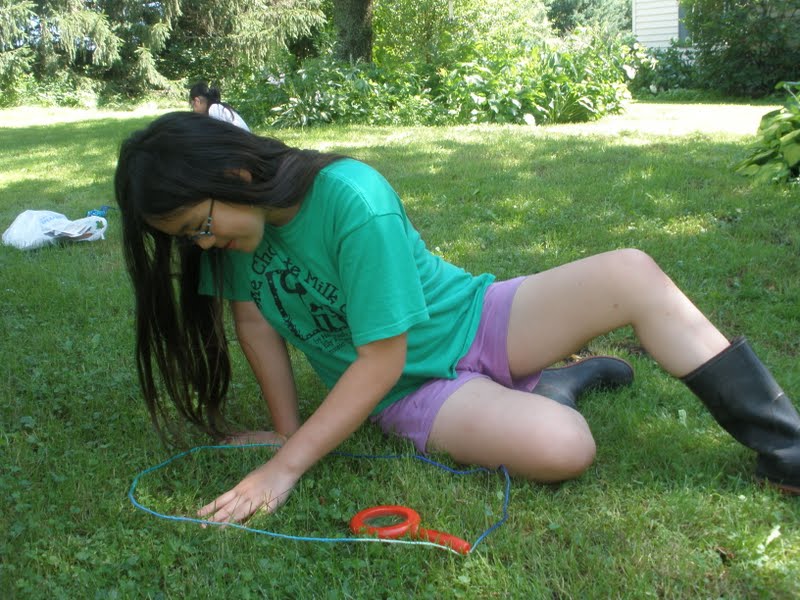
Measure the height of several different dandelion plants and compare them.

This was something that the girls enjoyed.  Their idea was to do a race to find the longest stem. 

Running to get dandelions and
bring them back to measure.

For the first round, Olivia found one with a 6″ stem and Sophia’s was 5 1/2″.  The second round, Sophia found one with an 11 1/2″ stem and Olivia found one with a 10″ stem. 

Olivia measuring a dandelion stem with
Montague standing behind her.

As noted above, dandelions can grow to be over two feet tall.  The girls wanted to see how tall this would be, so they put two rulers together. 

Imagine a dandelion growing this tall! 
Some of them do in meadows or where there is high grass.

Examine an unopened dandelion flower.

Sophia opening an unopened dandelion.

Watch a bee working in a dandelion.

We did not see any bees visiting the dandelions while we were outside.

Observe the seeds and how they are dispersed.

See pictures at the top of the post for the akenes on the dandelion as well as stuck to my shoe.  The girls both could see how they resembled umbrellas.  They also are similar to spiderlings in that they use the wind to find a new location in which to grow.

Observe your dandelions on a sunny day and then on a cloudy day. Note any differences.
We will do this over the weekend since another round of storms are forecasted to arrive on Friday.

Follow-Up Activities:


Take some time to draw the dandelion in your nature journal. Make sure to record your observations of the dandelion and make a sketch of the leaf and flower.

We ran out of time the afternoon when we did the study, so the girls still will need to do a journal page.

*~*~*~*~*~*~*~*~*~*~*

Other activities that we did:

We made Dandelion Flower Cookies.  The recipe is from The Splendid Table (on National Public Radio).  Note: Before making the cookies, read Dr. Peter Gail’s instructions for cooking with dandelion flowers (below the recipe).

The cookies are moist and taste have a pleasant, though not strong flavor.  The strongest flavor came from the vanilla, not from the dandelions.  The tiny yellow petals make the cookies pretty and unusual…certainly something that children will remember…hopefully in a good way.

Dandelion Flower Cookies
1/2 cup oil
1/2 cup honey
2 eggs
1 teaspoon vanilla
1 cup unbleached flour
1 cup dry oatmeal
1/2 cup dandelion flowers
Preheat oven to 375°F. Blend oil and honey and beat in the two eggs and vanilla. Stir in flour, oatmeal and dandelion flowers. Drop the batter by teaspoonfuls onto a lightly oiled cookie sheet and bake for 10-15 minutes.
Cooking with Dandelion Flowers
by Peter A. Gail, Ph.D
Dandelion flowers aren’t just pretty. They are also extremely nutritious food and have none of the bitterness of dandelion leaves if you cut off the green bracts at the base of the flower cluster.
To Prepare Dandelion Flowers for Use in Recipes:
  • Wash them thoroughly.
  • Measure the required quantity of intact flowers into a measuring cup.
  • Hold flowers by the tip with the fingers of one hand and pinch the green flower base very hard with the other, releasing the yellow florets from their attachment. Shake the yellow flowers into a bowl. Flowers are now ready to be incorporated into recipes.
Dandelion Cookies.

*~*~*~*~*~*~*~*~*~*~*

I found a few more uses for dandelions which we started to work on:  dandelion vinegar and dandelion-infused oil (which also can be made into a salve).
The first step for both the vinegar and oil/salve is to collect the blossoms.  Make sure they are from an area that isn’t sprayed with chemicals.  These dandelions came from our yard which is not sprayed.

Sophia collecting dandelion blossoms.

Fill a quart jar with blossoms. 

Olivia filling a jar with dandelion blossoms.

For the dandelion vinegar, cover with apple cider vinegar and then put a cover on the jar. 

Sophia pouring apple cider vinegar over
dandelion blossoms.
Place in a sunny location to steep.  Shake well every day.  After two weeks, strain with a cheesecloth.  The dandelion vinegar should be stored in the refrigerator and used on salads.

For the dandelion-infused oil, pour oil (olive, almond, or canola) over the blossoms until they are fully covered. Poke around with a wooden spoon handle to make sure there are no air bubbles.  Cover with a coffee filter held on by a rubber band (or a lid if you’re concerned about the jar being tipped over for some reason).

Olivia pouring oil over dandelion blossoms.

Place in a sunny location to steep for two weeks.  Stir the mixture once a day.

Dandelion vinegar (left) and dandelion-infused oil (right)
steeping in the sun.

After one week, strain the mixture, throw out the brown dandelions, and add fresh ones.  Cover with the coffee filter/lid and return to a sunny location for another week of steeping.  After two weeks, strain using a cheesecloth. 

We haven’t gotten this far yet, but to make the dandelion salve, make the dandelion-infused oil first.  Then add grated beeswax to the oil and melt it.  Add enough to reach your desired consistency.  To test the consistency, drip a drop of the mixture onto a plate.  It will cool immediately and you can see if it is thick enough. 

Dandelions have pain-relieving properties, so the oil and salve can be used for sore muscles or arthritis.  Just apply to the affected area.  It can also be used to relieve sinus headaches by rubbing a little on your forehead.  The salve and oil can be used for dry skin as well. 

As soon as the dandelion vinegar, oil, and salve are done, I’ll post pictures.

*~*~*~*~*~*~*~*~*~*~*

There are two more recipes that we want to make, but didn’t have enough time today:  dandelion jelly and dandelion fritters.  We’ll be making these items this week since there seems to be no shortage of dandelions in the yard.

*~*~*~*~*~*~*~*~*~*~*

The last thing we did as part of today’s study on dandelions was focused on storytelling and poetry.  I read to the girls the story about how you can’t pick a dandelion. It’s a lovely story and gives a very different view of what a dandelion is…as is anything in nature.

Then I read a poem about dandelions that came from a Waldorf website:

O DANDELION
O Dandelion, yellow as gold, what do you do all day?
“I just wait here in the tall, green grass, ’till the children come to play.”

O Dandelion, yellow as gold, what do you do all night?
“I wait and wait, while the cool dew falls, and my hair grows long and white.”

And what do you do when your hair grows white, and the children come to play?
“They take me in their dimpled hands, and blow my hair away!”

Read Full Post »

As part of the girls’ homeschool education, I want them to know how to play at least two different musical instruments. 

During the past nine months, Sophia has been learning how to play the piano.  I thought about starting lessons earlier; however she has learned how to play easily this year and is motivated to practice multiple times each day.  Her piano teacher said she progressed through more books/levels than any other student this year.  To me, that’s a good sign that it was the right time for her to begin learning how to play an instrument.

Beginning with the next school year (fifth grade which starts in July since I homeschool the girls year-round), I suggested that she learn to play an instrument in addition to the piano (either one that could be played in the orchestra or band). She picked the harp.

Sophia Playing the Harp
Sophia learning how to play the harp.

So, a couple weeks ago, we went to Musicmakers – a company that sells a variety of harps and other string instruments.  After looking at the different harps, we chose this one: a 31-string harp that is 54″ tall. It weighs about 24 pounds so it’s pretty easy to carry around…just a bit awkward.

This particular harp has all the levers on it already. Though it isn’t necessary at this stage to have levers on a harp, if she’s interested in the instrument long-term it’s good to have the levers on so she’ll be ready to use them.

Some of the strings on Sophia’s harp are different colors (e.g., C is red, F is blue) which helps the player find the string/note much easier.

As mentioned, Sophia knows how to play the piano.  I also know how to play the piano (thanks to my parents who paid for ten years of piano lessons for which I’m so grateful!).

Me Playing the Piano
Me playing the piano.
(Picture taken by Sophia.)

Knowing how to read music – especially piano music – is very helpful when playing the harp since there is some similarity between the two instruments.

Part of the Piano
Two pictures of the inside of our piano
while it was being tuned.
Piano Being Tuned

To me, an important part of playing instruments is the desire and willingness to share one’s gifts with others.  Starting as early as four months into playing, Sophia began participating in recitals.  She played in one in December at a nursing home with other students who are homeschooled and one in May at a church also with homeschool students.  Both were attended by well over 150 people.

For both recitals, she memorized two pieces, and was able to play them on a grand piano.  Getting comfortable playing an instrument in front of an audience from the beginning is much easier than doing your first recital after years of playing. 

Sophia's First Piano Recital
Sophia playing a piece at her first recital.

Olivia, who is 8 years old, will be starting piano lessons this summer. Sophia has been teaching her how to play some songs from her first music books; and Olivia practices each day…just like her older sister.

Olivia Playing the Piano
Olivia, at age 5, already wanting to play the piano.

Although choosing a second instrument to play comes later in elementary school, Olivia has expressed interest in playing the piccolo (although she has to learn the flute first in order to play the piccolo I’ve been told).  She also wants to play the guitar, but needs to wait until fourth grade when her hands are large enough to play a standard-size guitar. 

Olivia said, though, after hearing the harp and seeing her sister play it, “Well…maybe I might want to play the harp instead.”  So many possibilities in the mind of a child!

Olivia Behind the Strings
Olivia trying her hand at playing the harp.

Hip Homeschool Hop Button

Read Full Post »

This week I chose The Art of Simplicity by Candy Paull for my 21st book to read in the 52 Books in 52 Weeks challenge. 

I ordered this book from the library after seeing it on a recommended reading list that was distributed at a homeschool conference workshop about simplifying one’s life.  In addition to The Art of Simplicity, I ordered several other books that have the same overall theme. 

In comparison to the other books, The Art of Simplicity has a wealth of quotes from a variety of individuals.  There is limited writing by the author, though what is written is interesting and insightful. 

The author invites the reader to “…come explore the potential and magnificent power that has been buried beneath the clutter and confusion for so long.  Enter into the freedom of simplicity.”

I am beginning to learn that it is the sweet, simple things of life
which are the real ones after all.
Laura Ingalls Wilder

She encourages the reader to shift one’s focus:  “When you are tempted to focus too much attention on what you don’t have, a make a conscious decision to shift your focus to what you already have, and decide to appreciate it and enjoy it more fully and completely.”

The Art of Simplicity provides a thoughtful and, perhaps, different definition of simplicity than what other books about the same topic suggest.  “Simplicity is found in the common objects and objectives of each day.  It is in the choices to create inner stillness through meditation and prayer, clearing clutter in both inner and outer life, choosing positive rather than negative thoughts, handling money and resources wisely, and making that which is most meaningful to you a priority.”

The author continues to describe what simplicity is: “Whether it is in clothing that expresses your styles and values, or a home that provides a nurturing atmosphere, or meaningful work that satisfies your creative soul and helps others, or loving relationships that balance giving and receiving, or creating a more sustainable and just society, true simplicity integrates our gifts, talents, and choices with the deep needs of the world.”

Since The Art of Simplicity has so many quotes that I want to share with my daughters (who may not fully appreciate them now when they are in elementary school, but certainly could when they are older). I thought it would make a good starting point for copywork, transcription, and dictation lessons during the upcoming homeschooling year. (The website Simply Charlotte Mason has some guidelines for each grade with regard to this subject.)

What I like about this book is that it gives the motivation to simplify one’s life not with a list of “To Do” items, but rather with quotes that are inspiring and create the desire to change.  As the author concludes in the last chapter of The Art of Simplicity, “…the choices and attitudes that make life simpler and easier are ones of character and integrity. 

“Because you choose to cultivate character, honor your responsibilities, and believe in your own potential for good, you become a blessing to everyone around you.  You become a channel for good in the world, fulfilling your potential and your calling in ways that expand ever outward.”

Read Full Post »

Last year was the first year that I planted a vegetable garden with the girls. For the prior few years, I did not do much gardening.  This year, with the price of food rising so much, the girls and I expanded the garden; and did some much-needed maintenance on areas around and in the garden.

STEP ONE – WEEDING AND RAISED BED MAINTENANCE

Since I do not use any chemicals in the garden, lawn, or pastures, one of the perennial challenges is weeds.  There are four raised beds that were built back in the late 1990s when I offered a farm and art camp for children.  The wood was untreated (so no chemicals would contaminate the food), and has (unfortunately) reached the end of its life on several of the beds. 

As we weeded, we removed wood planks and pieces that no longer served a function.

Sophia and Olivia weeding one raised bed
in the vegetable garden.

There were two areas that we planted last year that needed the weeds pulled from this year.  The other two raised beds and cold frame were overgrown with wild black raspberries and needed to be cut back first before weeding could be done.

Raspberries trimmed back.
To better contain the raspberries and keep them upright, we’re going to put 4-6 stakes around the perimeter of the raspberry garden and tie twine around the stakes.  The area on all sides of the raspberry garden has a base of newspaper or cardboard and is topped with grass and straw. 

STEP TWO – NEW GARDEN AREA PREP

A book that I checked out from the library showed a way to create new garden space that would minimize (if not eliminate) weeding in the first – and hopefully subsequent – years.  During the first year, you put cardboard and/or newspapers down where you want your new garden.

Cardboard placed where we want new garden areas.
Rocks are holding the cardboard down.

Then, place bags of garden soil on top of the cardboard.  These will what the plants grow in during the first year.  Keep in mind that the bags are rather shallow, so root vegetables (e.g., beets, carrots, leeks) are not suitable for this type of gardening.  Instead, plant vegetables (such as beans) or herbs in them.

Bags of soil on top of cardboard. 
Newspapers topped with grass clippings for pathways.

After the first year of planting and harvesting, any remaining cardboard, newspaper, and the bags are discarded.  The soil that was in the bag is tilled into the ground which will be free from all grass and weeds since no light or water reached it during the first growing season.

Sophia hauling Olivia and grass clippings
to the garden for pathways. 
Montague is going along for the walk.

Since moving here in 1995, the trees have grown quite a bit.  The area next to the driveway (where the garden is located) use to be very sunny for the majority of the day.  Now, parts are shady so the girls and I shifted the garden a bit to the south.  The shadier area will be covered with straw and we will bring chairs out to enjoy the garden and/or perhaps read a book under the trees.

Olivia pruning a tree by the strawberries.

Also, we cut back some of the lower branches on the trees for ease of access to the garden as well as to reduce the amount of shade in the garden.

STEP THREE – READY TO START PLANTING

For the new areas in the garden, the next step was to cut open the tops of the bags.  It’s important to leave the sides on the bags so that the dirt doesn’t wash away (kind of like a miniature raised bed). 

Bags of soil cut open and ready for planting.
These were placed directly on the ground
versus placing them on cardboard. 
We will see if there’s a difference between
the gardens with and without cardboard as a base.

STEP FOUR – PLANTING

Depending on the item that is being grown, we planted vegetables and fruits from transplants or seeds.  Some of the transplants were purchased (e.g., cabbage, cauliflower, broccoli) while others were simply dug up and relocated to other parts of the garden (e.g., catnip, strawberries).

Olivia planting beans. 
She already completed 2 1/2 rows of onions.

This year, the herbs are in three locations.  The catnip came up again in a shady area in the garden and is thriving.  There was some stray catnip that was hiding under the rhubarb leaves and also faring well, so I transplanted that to be near the other catnip.

The second section of herbs is this one:

Herb garden.

The above garden has sage, lavender, majoram, thyme, parsley, chives, cilantro, and dill.  The third spot where herbs are planted is in the “pizza garden.”  These herbs are ones we use to make pizza: basil, rosemary, and oregano.

Many years ago, a friend taught me how to build a cold frame.  At the time, I had a window that was attached to the box that could be lifted and propped up in warmer weather, and kept down in colder weather.  It was a great way to start plants. 

There is now a gap in one corner of the cold frame.  However, I still wanted to use the space since the base is a mix of soil and compost that has aged for many years.  The cold frame is in a shadier area, so I thought lettuce would be good to grow here.

Weeded cold frame planted with lettuce seeds.
We like green and yellow (wax) beans, so we used all five bags for beans.  In addition, a couple rows of beans are planted near the onions in the new raised bed receiving the most sun as well as two rows in a shadier area. 
Because I homeschool the girls, I want them to see how well different vegetables grow in different parts of the garden (e.g., do beans need full sunlight all day, is partial sunlight okay, do the beans grow better in the bags of soil or directly in the ground).
Sophia planting several types of green and yellow (wax) beans
in the bags of soil.
We’ve been planting a “pizza garden” for a few years now.  It’s nice to be able to go to the garden and pick fresh vegetables and herbs and make pizza for dinner.  In the fall, I roast the tomatoes and then make a pizza sauce filled with other vegetables and herbs.  It’s a flavorful sauce that tastes great in the middle of winter.
It’s a bit difficult to see, but there are several types of tomatoes planted (yellow and red; full size, roma, and cherry), sweet peppers (green, yellow, red, and orange), leeks, and herbs.  Since this raised bed receives many hours of sunlight per day, we expanded the size of this bed on both ends. 
The “pizza garden” is planted with a variety
of vegetables and herbs.
The rhubarb and strawberry garden was overtaken by raspberries (red and wild black) as well as weeds.  After cutting back the raspberries, I weeded the garden and found that there were quite a few strawberries despite the “intruders.” 
In addition, the strawberries had sent out runners and new plants were growing around the raised bed.  So, once this area was weeded, I dug up all the plants that weren’t in the garden and transplanted them there.
I would like to have another rhubarb plant since rhubarb is so expensive in the store…especially when it’s not in season.
Rhubarb and strawberry plants.

Sophia wanted to grow peas this year since she’s never done that before.  We went to the farmer’s market earlier this week, and one of the farmers was selling peas to transplant. 
Sophia planting snow and shell peas.
Other vegetables that we planted but aren’t pictured or mentioned:  asparagus, beets, broccoli, cabbage, carrots, cauliflower, cucumbers, onions (red and yellow bulb as well as green onions), and zucchini.
Next project:  the flower gardens – including edible flowers for salads. The girls are ready to plant some new flowers this year from bulbs as well as transplants. 
The girls were having fun while hauling grass clippings
to the gardens to make pathways.

Read Full Post »

Older Posts »