Feeds:
Posts
Comments

Archive for the ‘organic fruit’ Category

Every Friday starting on July 1st through the middle of August, there’s a Smart Summer Challenge going on at Pink and Green Mama,  Naturally Educational, and Teach Mama.  The goal is to do daily educational (yet fun) activities with your children. 

As the challenge says, “The learning activity can be as simple as reading a book, or doing a simple science experiment, or as involved as packing up the crew and visiting a museum or hiking your local park. It’s as involved as you want it to be, and our focus is to help parents realize the important role they play in helping their kids avoid the summer learning slump.”

They have daily suggestions for ideas if you need inspiration, and each ties into a weekly theme.  This week, the theme was “You are on the Map.” 

During the past week we did the following activities:
Sunday – Did 4-H projects for the county fair.  Both the girls finished their embroidery projects – Olivia made an embroidered pillowcase and wall hanging; and Sophia made an embroidered stuffed dog.
Olivia’s embroidered elephant.

Olivia embroidered the first letter of her name
as well as flowers, leaves, and vines.

At 8 and 10 years old respectively they’ve been doing embroidery for a few years now and enjoy it.

Today’s map location:  home (to do the project).  Embroidery, itself, though is believed to have originated in the Orient and Middle East at about the same time. Chinese embroidery dates back to at least 6,000 BC. (Source)

Monday – Olivia learned to do papercutting with an exacto knife for one of her 4-H projects.  This was a challenging project because the knife has to be held a certain way in order for it to cut properly.  After cutting the image of the horse, she layered black and blue paper behind the cut-out sections to create the picture.

This is the paper cutting that Olivia made. 
She cut the image out of white paper with a knife and
then punched holes with a paper punch along the top and bottom.
She put black paper behind the horse and
then blue paper behind the entire picture.

Sophia spent the majority of the day preparing food for her 4-H demonstration about using herbs in cooking/baking, medicines, and personal care products.

Sophia doing a 4-H demonstration about herbs.
She showed how to make cucumber-basil-ginger herbal water,
sage tea, and lavender spray. In addition to these items,
the club members and parents could sample
chocolate chip mint cookies and iced mint tea.
All the herbs used were from our garden.
Both the girls did a demonstration in front of about a dozen people on Monday night. 

Olivia loves to do puzzles, so she did a demonstration titled
“How to Eat a Puzzle.”
She showed the 4-H members and parents how to make
a puzzle sandwich, and then
invited them to eat their first puzzle piece. 
Puzzle sandwich that Olivia and I made together.

They will do the same demonstration at the County Fair on July 13th.

We also visited two farms where 4-H members live.  One had rabbits, horses, dogs, and cats.  The 4-H member focused on sharing information about her rabbits and showing them at the fair.

The girls listening to a presentation about rabbits.
Rabbits are on their list of animals they’d love to have.

The other place we visited was a dairy farm.  The girls both learned a lot about raising and showing dairy cows; and now want to do the dairy project. 

Olivia is taking a look at a three-year old cow.
They would start out with a spring calf to show next year (one that is born in March-May 2012; and show it in July 2012).
This is the size calf that the girls would work with:
about 100 or so pounds.  Not the huge 1,500+ pound ones.
Today’s map location:  three different rural towns in Minnesota (including home).  Olivia’s paper cutting projects has ties to China.  More information about paper cutting is HERE. 4-H began in 1902 in Clark County, Ohio.  More information about 4-H is HERE.
Tuesday – The girls enjoyed having two friends over.  They introduced them to Bailey and Hoss (the pony and miniature horse), played a game, climbed trees, had a picnic in the fort, and searched for and found lots of frogs and toads. 
In the afternoon and evening, we spent time reading.  One of the books we read was Arabian Nights: Three Tales by Deborah Nourse Lattimore.
 
Today’s map location:  Today was spent at home.  One of the stories we read takes place in ancient Cathay (known today as China). The other stories were set in fictional locations.
Wednesday – We picked strawberries at a nearby patch and learned about strawberries.

Sophia holding some strawberries that she picked.

We also went to a buffalo farm and were so excited to see lots of young ones in the pasture.

Buffalo in the pasture.

In the late afternoon, we had a backyard picnic while enjoying the sounds of nature.  The strawberries and picnic tied into our on-going nature study that we do (we try to do at least one nature study per week using the Handbook of Nature Study).

Having a picnic on the deck.

Today’s map location:  two small towns in Minnesota (one for the patch and picnic; and the other for the buffalo farm.

In addition, we can add Brittany, France (where the garden strawberry was first bred) to the places we “visited” this week.  The garden strawberry is a cross between two varieties – one from North America and the othe from Chili.  The former is noted for its flavor while the latter was noted for its larger size.

For the American bison (also known as the American buffalo), the location is North America.  At one time, their range was roughly a triangle between the Great Bear Lake in Canada’s far northwest, south to the Mexican states of Durango and Nuevo León, and east along the western boundary of the Appalachian Mountains. Due to commercial hunting and slaughter in the 19th century, the bison nearly went extinct. Today, buffalo can be found in reserves, on farms, and a few national parks.

Thursday – Sophia had a harp lesson in the morning; we went to the library to return some books and check out more books; and learned about Vietnam a bit in the afternoon.  We are finishing up our multi-year around-the-world geography study. 

Some of the postage stamps from Vietnam that
Sophia has in her geography book.

We skipped ahead from U to W back when Prince William and Princess Catherine were married (since Prince William’s mother was from Wales)…and then continued on with X, Y, and Z (Mexico – since no countries in the world start with the letter X; Yemen; and Zambia). 

Realized we didn’t do V…so we began learning about Vietnam today. 

Today’s map location:  two cities and one rural town in Minnesota for the harp lesson, library, and at-home study.  We also learned about Vietnam today…so we “traveled” back to the east.

Read Full Post »

This week we focused on the Outdoor Hour Challenge Crop Plants #5Strawberries that is at the Handbook of Nature Study website.

Throughout this post, three different typefaces are used:
– Bold – are words from the Handbook of Nature Study website.
– Italics – are words from the book titled Handbook of Nature Study by Anna Botsford Comstock.
– Regular – are my own words.

Inside Preparation Work

1. Read in the Handbook of Nature Study pages 608-611.

Here are the parts that I found interesting that I shared with Sophia and Olivia:

– The strawberry’s five petals are little cups of white held up protectingly around anthers and pistils.

The five cup-like petals of a strawberry plant.
This one is growing in our garden.
You can see the many pistils that are each lifting up a stigma.

– At the every center of the flower is a little, greenish-yellow cone, which, if we examine with a lens, we can see is made up of many pistils set together, each lifting up a little circular stigma.

– The strawberry leaf is beautiful; each of its three leaftlets is oval, deeply toothed, and has strong reular veins extending from the midrib to the tip of each tooth.  In color it is rich, dark green and turns to wine color in autumn.

Strawberry leaf with its three leaflets.

– As the strawberry ripens, the petals and stamens wither and fall away.

Strawberries in various stages of ripeness.
By this stage, the petals and stamens
have withered and fallen away.

– The strawberry is not a berry, that definition being limited to fruits having a juicy pulp and containing many seeds, like the currant or grape.

– The strawberry is a fleshy fruit bearing its akenes, the hard parts which we have always called seeds, in shallow pits on its surface.

Holding some strawberries that were just picked.
The akenes (what we call seeds) are easily seen
in shallow pits on the surface of the strawberries.

– The root of the strawberry is fibrous and threadlike.

– The runners begin to grow after the fruiting season has closed.  Each runner may start one or more new strawberry plants.

Sophia holding a runner from a strawberry plant.

– After the young plant has considerable root growth, the runner ceases to carry sap from the main stem and withers to a mere dry fiber.  The parent plant continues to live and bear fruit…but the later crops are of less value.

2. The lesson suggests that each child have a strawberry plant with roots and runners attached to observe in person. This may not be possible but perhaps you can find a plant that you can observe with its leaves and a green or ripe strawberry.

The girls each went to the garden to take a look at the strawberries as well as went to the berry patch to pick strawberries.  They found some runners in the garden.

Olivia found a runner on one of the strawberry plants.

Outdoor Time

3. For this challenge, spend 10-15 minutes outdoors. This would be a great time to check up on any crop plants that you have been growing in the garden. If you don’t have any crop plants growing, spend your time observing in your own backyard looking for a subject that interests your children. Perhaps you could bring along your magnifying glass and inspect leaves or flowers or insects. Enjoy this time together.

We split the outdoor time into two different parts – one was at the strawberry patch where we picked two flats of strawberries with my sister, Mary (the girls’ aunt); and the other was taking a look at the vegetable and herb garden and seeing how everything is doing.

The girls with their aunt picking strawberries
at the berry patch.

We enjoyed picking strawberries and came home with two flats of berries. 

Sophia with some of the berries she picked.

The girls were so excited when they found large ones or unusually-shaped ones.  Sophia found a heart-shaped strawberry which was neat to see. We have found heart-shaped rocks before…but never a heart-shaped strawberry.

After picking the strawberries, we came back home and showed Mary the vegetable and herb garden.  Things that can be harvested include: a few small strawberries, lettuce, rhubarb, and herbs.

A cucumber starting to grow
with the blossom still attached.

Things that are growing, but not yet ready to harvest are: a variety of  small tomatoes, a zucchini, some tiny cucumbers, onions, beets, raspberries (black and red), onions, leeks, and peas.

The tomatoes are starting to grow.

Things that haven’t yet shown any blossoms or small vegetables include: beets, carrots, peppers, cabbage, and cauliflower.

Follow-Up Activity

4. Allow time for discussion and a nature journal entry after your outdoor time. Follow up any interest in any subjects you observed during your outdoor time either in the Handbook of Nature Study or in a field guide.
We talked about picking strawberries and how there seemed to be fewer berries than in past years.  The strawberry season is very late this year due to unseasonably cold temperatures and lots of rain.  When we started picking strawberries, there were very few.  However, as we spent more time and went further down the row, we found larger berries. 

The girls have been finding lots of tiny toads in the garden area this year.  When the 4-H club visited on Monday night, a few people were talking about them and saying that due to the amount of rain we received this year so far, there have been more frogs and toads than in past years. 

Tiny toad that Olivia found in the garden.
The girls collected more than 80 of these the other day.
After observing them, they released them back into the garden.

5. Have some fresh strawberries on hand for observation and then eating.

We will be taking a closer look at the strawberries and observing them tomorrow.  We have several recipes that we will be trying over the next few days. 
Here are some ideas for careful observation:
  1. Notice the strawberry’s color, shape, size, seeds, hull, and stem.
  2. Smell the strawberry.
  3. Take the stem in your right hand and the berry in your left hand and pull. What happens?
  4. Look at the seeds on the outside of the berry. What are their size and shape? (use a magnifying glass)
  5. Cut the berry vertically and notice the colored layers. (some red, pink, white, or green)
  6. Are there seeds on the inside of the berry?
  7. Cut a cross section and describe the inside of the berry.
  8. Eat the strawberry and describe its taste.

6. Your journal entry could include:

  • Drawing of the whole berry, showing the shape, stem, and the pattern of seeds.
  • Drawing of a vertical section, showing the shape, stem, and the seeds on the outside. (cut the berry in half lengthwise)
  • Drawing of the horizontal section, showing the seeds, and the colored ring. (cut the berry in half crosswise)
  • Drawing of a strawberry leaf if possible showing the distinct shape.

Read Full Post »

Last year was the first year that I planted a vegetable garden with the girls. For the prior few years, I did not do much gardening.  This year, with the price of food rising so much, the girls and I expanded the garden; and did some much-needed maintenance on areas around and in the garden.

STEP ONE – WEEDING AND RAISED BED MAINTENANCE

Since I do not use any chemicals in the garden, lawn, or pastures, one of the perennial challenges is weeds.  There are four raised beds that were built back in the late 1990s when I offered a farm and art camp for children.  The wood was untreated (so no chemicals would contaminate the food), and has (unfortunately) reached the end of its life on several of the beds. 

As we weeded, we removed wood planks and pieces that no longer served a function.

Sophia and Olivia weeding one raised bed
in the vegetable garden.

There were two areas that we planted last year that needed the weeds pulled from this year.  The other two raised beds and cold frame were overgrown with wild black raspberries and needed to be cut back first before weeding could be done.

Raspberries trimmed back.
To better contain the raspberries and keep them upright, we’re going to put 4-6 stakes around the perimeter of the raspberry garden and tie twine around the stakes.  The area on all sides of the raspberry garden has a base of newspaper or cardboard and is topped with grass and straw. 

STEP TWO – NEW GARDEN AREA PREP

A book that I checked out from the library showed a way to create new garden space that would minimize (if not eliminate) weeding in the first – and hopefully subsequent – years.  During the first year, you put cardboard and/or newspapers down where you want your new garden.

Cardboard placed where we want new garden areas.
Rocks are holding the cardboard down.

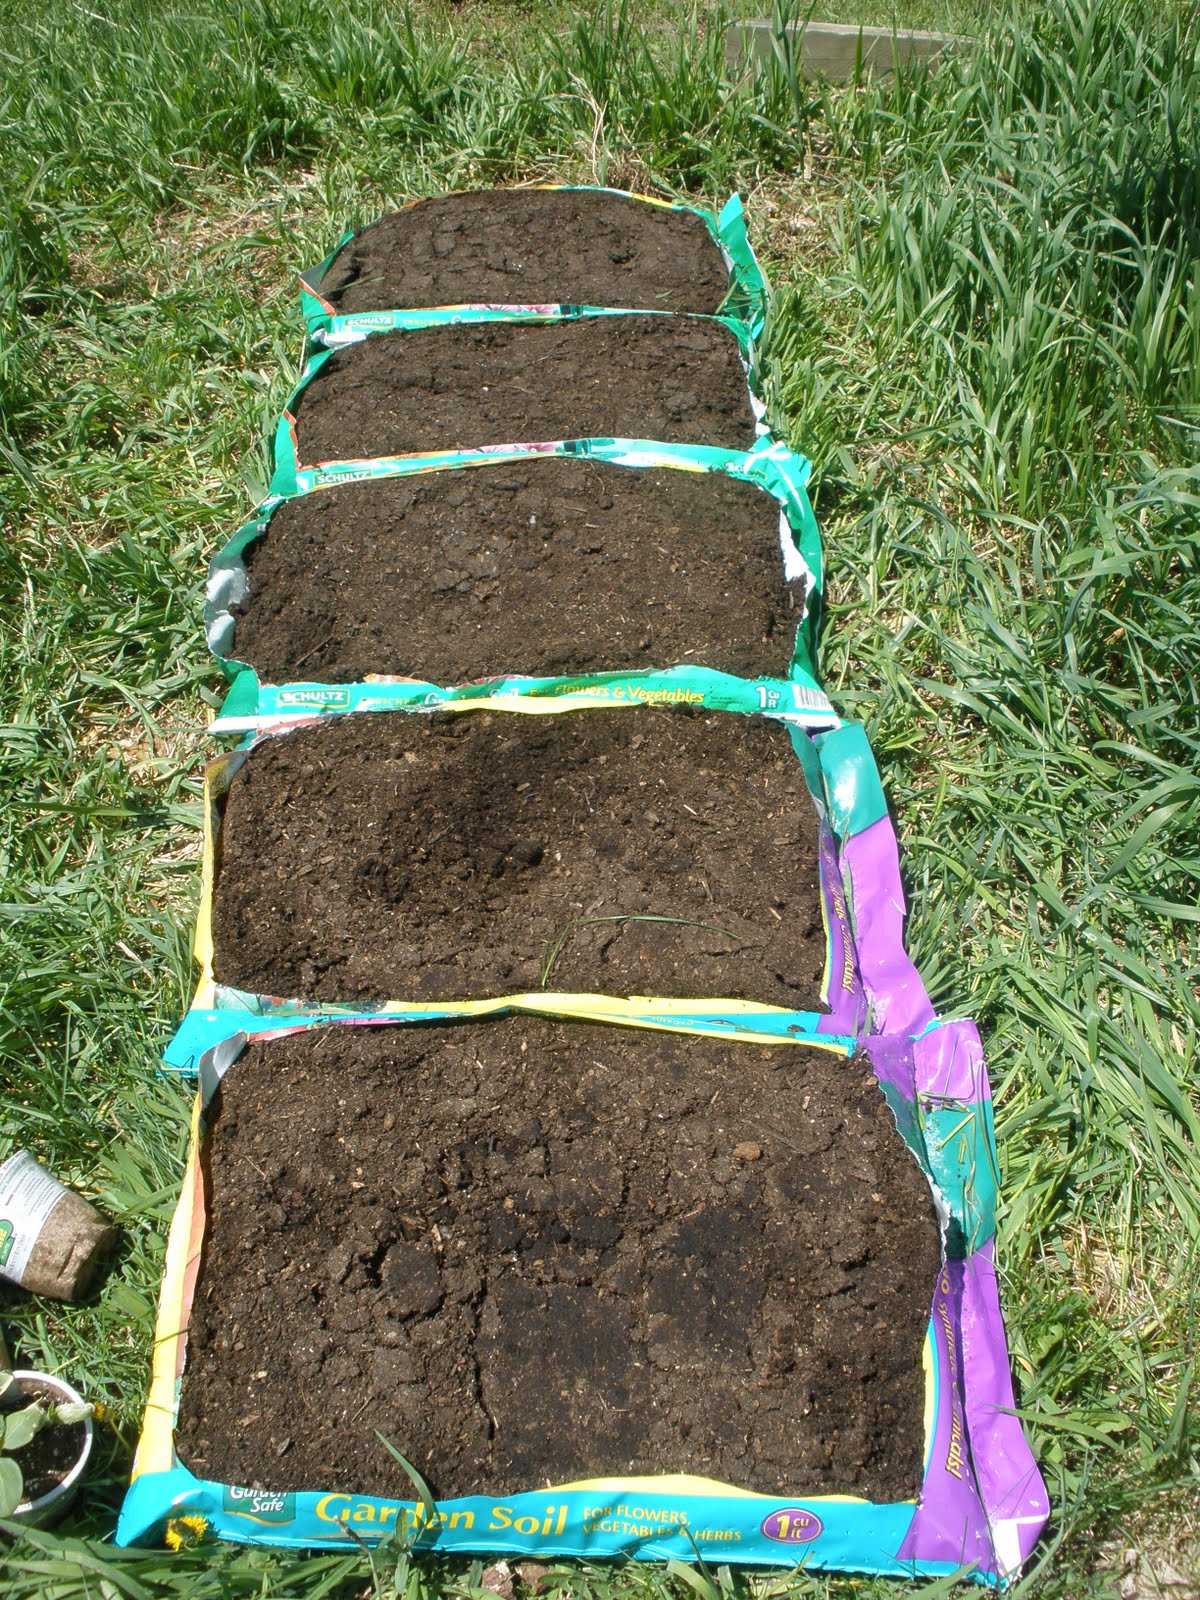
Then, place bags of garden soil on top of the cardboard.  These will what the plants grow in during the first year.  Keep in mind that the bags are rather shallow, so root vegetables (e.g., beets, carrots, leeks) are not suitable for this type of gardening.  Instead, plant vegetables (such as beans) or herbs in them.

Bags of soil on top of cardboard. 
Newspapers topped with grass clippings for pathways.

After the first year of planting and harvesting, any remaining cardboard, newspaper, and the bags are discarded.  The soil that was in the bag is tilled into the ground which will be free from all grass and weeds since no light or water reached it during the first growing season.

Sophia hauling Olivia and grass clippings
to the garden for pathways. 
Montague is going along for the walk.

Since moving here in 1995, the trees have grown quite a bit.  The area next to the driveway (where the garden is located) use to be very sunny for the majority of the day.  Now, parts are shady so the girls and I shifted the garden a bit to the south.  The shadier area will be covered with straw and we will bring chairs out to enjoy the garden and/or perhaps read a book under the trees.

Olivia pruning a tree by the strawberries.

Also, we cut back some of the lower branches on the trees for ease of access to the garden as well as to reduce the amount of shade in the garden.

STEP THREE – READY TO START PLANTING

For the new areas in the garden, the next step was to cut open the tops of the bags.  It’s important to leave the sides on the bags so that the dirt doesn’t wash away (kind of like a miniature raised bed). 

Bags of soil cut open and ready for planting.
These were placed directly on the ground
versus placing them on cardboard. 
We will see if there’s a difference between
the gardens with and without cardboard as a base.

STEP FOUR – PLANTING

Depending on the item that is being grown, we planted vegetables and fruits from transplants or seeds.  Some of the transplants were purchased (e.g., cabbage, cauliflower, broccoli) while others were simply dug up and relocated to other parts of the garden (e.g., catnip, strawberries).

Olivia planting beans. 
She already completed 2 1/2 rows of onions.

This year, the herbs are in three locations.  The catnip came up again in a shady area in the garden and is thriving.  There was some stray catnip that was hiding under the rhubarb leaves and also faring well, so I transplanted that to be near the other catnip.

The second section of herbs is this one:

Herb garden.

The above garden has sage, lavender, majoram, thyme, parsley, chives, cilantro, and dill.  The third spot where herbs are planted is in the “pizza garden.”  These herbs are ones we use to make pizza: basil, rosemary, and oregano.

Many years ago, a friend taught me how to build a cold frame.  At the time, I had a window that was attached to the box that could be lifted and propped up in warmer weather, and kept down in colder weather.  It was a great way to start plants. 

There is now a gap in one corner of the cold frame.  However, I still wanted to use the space since the base is a mix of soil and compost that has aged for many years.  The cold frame is in a shadier area, so I thought lettuce would be good to grow here.

Weeded cold frame planted with lettuce seeds.
We like green and yellow (wax) beans, so we used all five bags for beans.  In addition, a couple rows of beans are planted near the onions in the new raised bed receiving the most sun as well as two rows in a shadier area. 
Because I homeschool the girls, I want them to see how well different vegetables grow in different parts of the garden (e.g., do beans need full sunlight all day, is partial sunlight okay, do the beans grow better in the bags of soil or directly in the ground).
Sophia planting several types of green and yellow (wax) beans
in the bags of soil.
We’ve been planting a “pizza garden” for a few years now.  It’s nice to be able to go to the garden and pick fresh vegetables and herbs and make pizza for dinner.  In the fall, I roast the tomatoes and then make a pizza sauce filled with other vegetables and herbs.  It’s a flavorful sauce that tastes great in the middle of winter.
It’s a bit difficult to see, but there are several types of tomatoes planted (yellow and red; full size, roma, and cherry), sweet peppers (green, yellow, red, and orange), leeks, and herbs.  Since this raised bed receives many hours of sunlight per day, we expanded the size of this bed on both ends. 
The “pizza garden” is planted with a variety
of vegetables and herbs.
The rhubarb and strawberry garden was overtaken by raspberries (red and wild black) as well as weeds.  After cutting back the raspberries, I weeded the garden and found that there were quite a few strawberries despite the “intruders.” 
In addition, the strawberries had sent out runners and new plants were growing around the raised bed.  So, once this area was weeded, I dug up all the plants that weren’t in the garden and transplanted them there.
I would like to have another rhubarb plant since rhubarb is so expensive in the store…especially when it’s not in season.
Rhubarb and strawberry plants.

Sophia wanted to grow peas this year since she’s never done that before.  We went to the farmer’s market earlier this week, and one of the farmers was selling peas to transplant. 
Sophia planting snow and shell peas.
Other vegetables that we planted but aren’t pictured or mentioned:  asparagus, beets, broccoli, cabbage, carrots, cauliflower, cucumbers, onions (red and yellow bulb as well as green onions), and zucchini.
Next project:  the flower gardens – including edible flowers for salads. The girls are ready to plant some new flowers this year from bulbs as well as transplants. 
The girls were having fun while hauling grass clippings
to the gardens to make pathways.

Read Full Post »

Finally…done with planning the gardens for the upcoming season!  Sophia, Olivia, and I looked through all the vegetable, fruit, and flower garden ideas in my files and books, and now have some ideas for maintaining and expanding the gardens.

About ten or so years ago, this map was made of the property by a graphic designer with whom I worked.  It gives an overview of the layout of the farm and where things are located.

Map of the farm.

Since my computer and graphic design skills are rather limited, I did the garden plans by hand.  The first area – and the one that provides some food for us – is located in section 2 (see map above) right off the driveway and near the home.

Current vegetable garden with plans to expand it this year.
The vegetable garden has four existing raised beds as well as one cold frame.  However, they are all more than ten years old and need repair.  That will be the first priority. 
Once they are repaired and compost is added, these areas will have tomatoes, peppers (green, red, and yellow), beets, leeks, lettuce, and herbs. 
Two of the raised beds have fruit:  raspberries, strawberries, and rhubarb.  I want to add one more rhubarb plant, put a covering over the strawberries, and stake up the raspberries since they are overtaking more than their raised bed space. 
There are four new areas that will be added this year in the vegetable/fruit garden area.  These will include: carrots, tomatoes (cherry, roma/paste, pear-shape, and beefsteak), yellow beans, green beans, cabbage, broccoli, and herbs. 
The herb garden will have a variety of herbs that I commonly cook with:  basil, chives, cilantro, dill, mint, oregano, parsley, rosemary, sage, and thyme.
A couple new things I’d like to try this year are scented geraniums and Signet marigolds.  Both of these items can be used when preparing food.  The geraniums come in a variety of scents and can flavor what you are cooking/baking.  A recipe I have is for scented geranium poundcake.  The Signet variety of marigolds (e.g., lemon gem, tangerine gem) also can be used in recipes such as beverages and baked goods.
Signet marigolds on cheese and crackers.
The other vegetable garden is more of a shady one and is located in Section 3 (see map at top of the post).  The girls and I tried potatoes, beets, and beans there last year after weeding it and transplanting flowers that were it.  Unfortunately, by the middle of the summer the surrounding trees had filled in and shaded most of the garden.
So, the new plan is to focus on plants and edible flowers that can tolerate shade to limited sunlight. 
Plan for a garden that gets some sunlight…but is mostly shady.
Towards the front of the garden will be edible flowers – nasturtiums, marigolds, Johnny jump-ups, pansies, signet marigolds, and violets. 
Behind the flowers will be radishes and lettuce.  On the left side of the garden will be spinach and mint.  The back section is left open if there’s additional vegetables that can grow in the shade or if there are some perennial flowers that can be grown there that can be cut and used for arrangements in the home.
This garden will have to have a short fence around it to keep rabbits out of it.  The rabbits seem to think that some of the vegetables and fruit in the gardens are planted just for them. 
One Evening's Harvest
Some of the vegetables from one night’s harvest
during Summer 2010.

Around the garden area – in an area yet to be determined – we will be growing cucumbers and zucchini.  Last year, we had a bumper crop of cucumbers, but the vines were all over the place.  This year, we’re going to use bamboo towers to train the vines to grow up (rather than spread out). 
I thought that we would try potatoes again, but this time use tires (again, growing plants vertically).  However, in doing a bit of research about this method, I decided that purchasing potatoes from an organic farmer at the farmer’s market is a better option. Apparently, tires leach petroleum distillates and we grow all the vegetables and fruit organically, so that’s not a good option for the girls and me. 
One more area that I’ve been wanting to do something with is the little arbor that my brother put in many years ago.  It hasn’t been used much, and I like to something with it since it is next to the lilacs, a birdhouse, and the nature trail.  It’s a quiet area that would be a good spot for reading or relaxing. 
I saw in one of the gardening books the idea of using canning or food jars as miniature herb gardens.  Using wire, you create a hanger for the jar.  I couldn’t find a picture on the internet, but I did find this picture which kind of gives a similar idea:
Hanging vases.
At one time – over ten years – I had a closed loop trail plowed and leveled (shown in Sections 4-9 in the map at the top of this post).  I would mow it and it provided a wonderfully relaxing walk in the mornings or late afternoons as the sun was setting.  Then…a development was put in next door and now houses overlook this part of the farm.  I stopped mowing the trail and it has now become more wild and bumpy (thanks to gophers).
I thought it might be good to re-visit the trail since a row of pine trees is now growing in quite nicely along the east side of the property (which will hopefully block out the view of the homes eventually).  So, the plan would be to plant more trees along the trail that would provide fall color in shades of red, orange, yellow, and gold.  There are some trees and bayberry bushes out on the trail already which is a good start.
Plan for the closed-loop trail. 
Some trees and items (e.g., benches, bluebird houses)
are already in place.  The items with a * need to be added.

The girls and I are excited about planting the gardens this year, and then being able to enjoy the produce during the summer as well as preserving some of it for use in the winter (either by canning, freezing, or drying it).

Read Full Post »

Hot Spot #4 for Project Simplify’s five-week challenge was focused on the pantry and refrigerator.  Since I did some major cleaning and organizing of the cupboards for the 30 Day Vegan workshop, I chose to focus on the refrigerator for this challenge.

This challenge came at a perfect time.  I had some gift cards that I had been saving, and now could get a new appliance with them.

It was time to get rid of the 12-year old refrigerator that no longer had the bins for fruits and vegetables, the shelf propped up with a knife, and the shelves on the door held on with duct tape.  Although it was still working, it was not an energy-efficient appliance. 

The challenge with finding a new refrigerator is that I have 28″ of space available.  The door leading to the kitchen is only 29″ wide and the space in the kitchen for the refrigerator is 28″ wide.  There are not many refrigerator/freezers out there that are so narrow.  It is quite limiting.  In fact, there was only one model that fit into the space. 

The morning that the refrigerator/freezer was being delivered, I took one last look at the one I used for over 12 years:

Very crowded and disorganized refrigerator.
Notice the missing bins, shelf being held up with a knife,
and the shelves being held with duct tape.
It’s time for a new refrigerator!
The freezer with absolutely no
organizational system.
The freezer shelves in the
old refrigerator/freezer.

I transferred all items from the freezer to the large freezer in the mudroom.  All the magnets, artwork, and photographs came off the sides of the refrigerator.  Some of the business magnets or ones that had seen better days immediately went into the trash.

When the delivery men arrived, I unloaded all the items from the refrigerator.  They set up the refrigerator/freezer and took the old one away. 

As I began putting items into the new refrigerator, I checked all expiration dates to make sure items were still okay to use.  Anything that hadn’t been used in awhile (on the door shelves), I threw away the contents and soaked the bottles to get the labels off. (I reuse the glass bottles to hold homemade dressings and food I buy in bulk at the co-op.  I’m trying to get away from using plastic, but it’s a slow process making that transition.)

I picked some items from the big freezer to put into the new freezer – like juices; butter (dairy free and regular); a variety of frozen vegetables; frozen fruit that the girls and I picked during the summer and froze; a couple packages of meat; and a few containers that have food that can be re-heated (e.g., stuffed peppers). 

Here’s what the refrigerator and freezer look like now:

The new refrigerator/freezer with
only the items that I’m going to use. 

It is so much easier to find things now, and only the items that I’m going to use are in the refrigerator and freezer.  It’s been a few days now since I did this, and it has been wonderful to have a fully-functional and working refrigerator/freezer. 

When I’m making 21 meals a week (breakfast, lunch, and dinner since the girls are homeschooled and we eat all our meals at home…unless we are helping my parents and they want to take us out for lunch), having an appliance that works and is in good order is nice.  It makes meal preparation so much more enjoyable!  Truly, it is simple things like this that make me happy.

Read Full Post »


Storm Clouds
Originally uploaded by
Pictures by Ann

One of the reasons I like living in the country is the open space. This is the view looking east one morning. There have been a series of storms recently.

On Monday, there was a severe storum, but most of it was south of here which was a relief. Watched the weather report until almost 11 p.m. due to the threat of a tornado and high winds. Ended up getting a lot of lightening and thunder, and some rain.

This storm was all rain – things are definitely green around here now. The corn across the street is well over six feet high. The trees are loaded with plums, pears, cherries, and apples now. Days filled with canning and preserving the summer fruit is right around the corner.

Read Full Post »

It’s definitely summer now and the garden is starting to produce some favorites – like rhubarb.

Here Olivia is holding two stalks of rhubarb from the garden. The leaves have to come off before they come into the house since they are poisonous to cats.

So far, we’ve enjoyed rhubarb sauce, crisp, and coffee cake. Sophia has requested a rhubarb pie.

Before long, it will be time to can some rhubarb sauce and freeze some cut-up rhubarb for use during the winter.

Read Full Post »

The pears are beginning to grow. This picture was taken on June 21st…the start of the growing season. There doesn’t look like there are as many pears this year.

Unfortunately, there were two major wind and hail storms (the Sunday of Memorial Day weekend and May 31st). The pear and plum trees were both full of blossoms. After the wind/hail storm…very few remained.

I’m grateful, though, that some pears and plums are growing. Fresh, organic fruit straight from the tree can’t be beat.

Read Full Post »